Sunday 18 August 2013

Potato Dauphinoise with Quorn Fillet and Vegetables - Recipe


Today was a lovely day as I had quality time with myself. Sometimes that is really needed. The whole family was away and I enjoyed a day at home and also had some shopping time all alone. When I am alone, I can get lazy and try to eat something really simple that takes no time make. Usually some sort of baguette filled with cheese and veggies or something from the freezer.

Today after shopping, I went quickly to Sainsbury's (local supermarket) to see if they had anything on sale. Well they had. I bought a package of potato dauphinoise and Quorn roast style sliced fillet. I already had some frozen veggies at home, so I decided to make something simple out of these things. Nothing difficult, just a few steps to put them together and bake. I love when I find different ingredients (raw or cooked) that goes well together.


I was not sure how the quorn fillet would taste but I was pleasantly surprised as it was really tasty. I don't often buy it, but after this dish I might give it more tries.

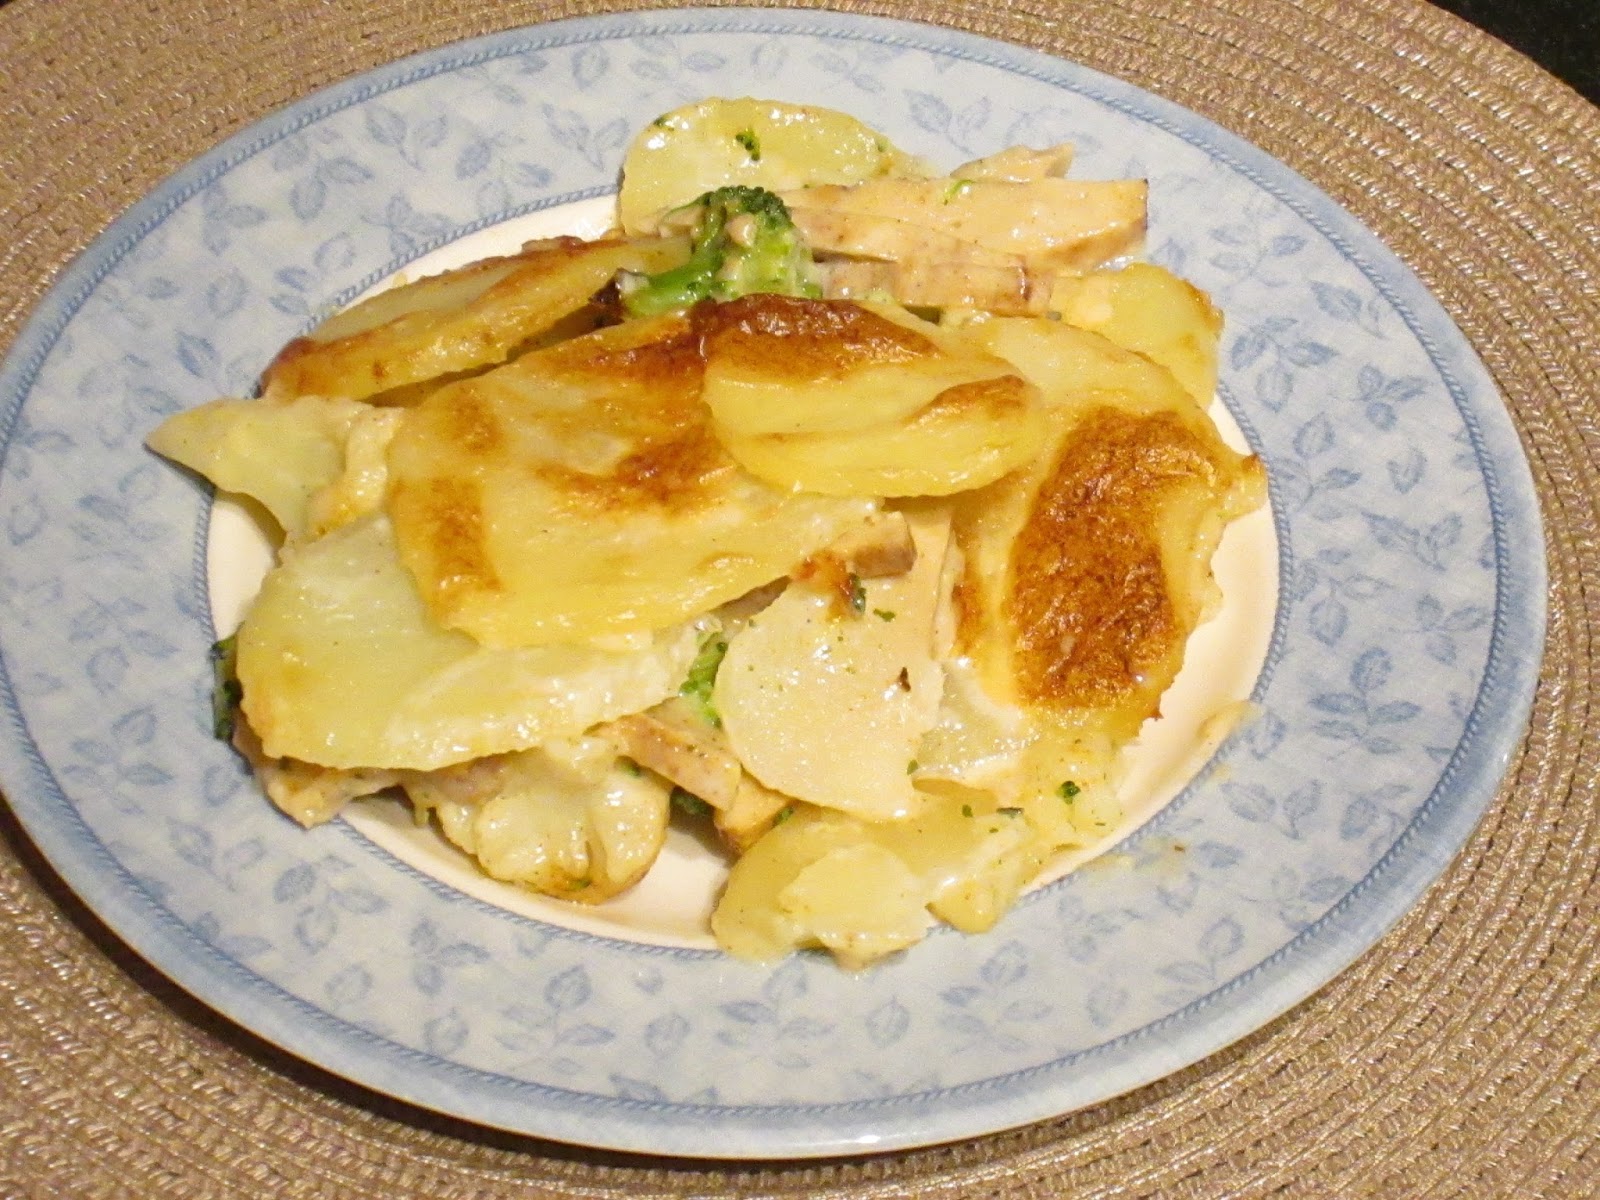
I can't really say that it tasted like chicken, as it had a distinct taste, but was really tasty and juicy. It worked perfect with the vegetables, potato and the cream sauce. The flavors went really well together and it was very creamy and delicious. 

Ingredients:
1 pack potato dauphinoise
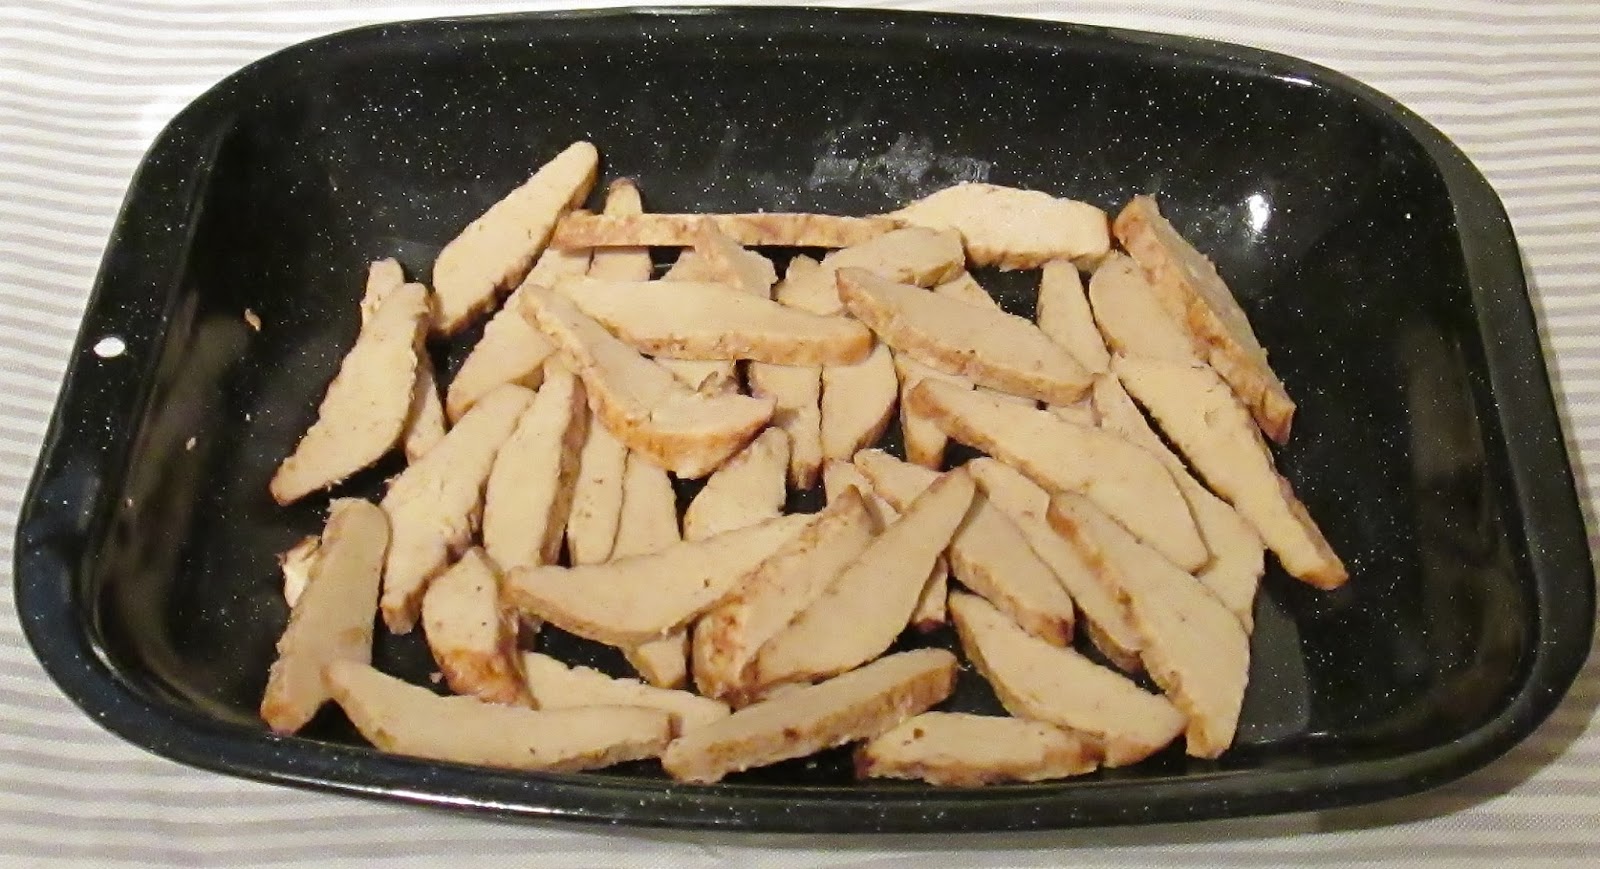
1 pack quorn style sliced fillet
1-2 cups of frozen vegetables such as carrot, broccoli and cauliflower

Season to taste: salt, pepper, garlic, paprika powder

Method:
1- Take one small oven dish for 2  people. I used my enamel oven dish which worked perfect. Layer out the quorn fillet on the bottom.


2- Continue to layer the vegetable over the quorn fillet. Season with salt, pepper, garlic powder and paprika to taste.


3- Finish of the last layer of the potato dauphinoise. Spread the potato and the cream sauce all over the fillet and vegetables. Bake it in the oven in 200 degrees for 20-30 minutes or until golden brown.


4- Serve as is or with a green salad.


Enjoy!

Thursday 8 August 2013

Grilled Chicken with Reggae Reggae sauce and Bulgur - Recipe and Review

I don't use store bought sauces very often, but sometimes you just find those gems that are just perfect among all the others. The reggae reggae jerk/bbq sauce by Levi Roots is one f those lovely sauces. So how do i use it? Well, my favorite way is very simple and easy to make. And it involves chicken. Here is how I make it:


Ingredients:
Few chicken pieces of your choice, I use chicken drums, wings and thighs
Reggae reggae sauce, jerk/bbq
few sliced veggies of your choice, I used leek, aubergine, potato, zucchini, celery
Bulgur
2-3 tbsp oil
salt and pepper
paprika powder

Method:
1- Preheat the oven to 220 degrees. Put the watched pieces of chicken in a roasting pan. I usually use an enamel roasting pan with a lid.

2- Choose veggies of your choice such as zucchini, potatoes, paprika, aubergine, leek and celery. Dice them to bite size and add them to the roasting pan. Pour over the reggae reggae sauce over the chicken and vegetables and put on the lid. If you don't have a lid, cover with aluminium foil. Cook in the oven for 40 minutes to 1 hour or until it looks grilled. 

3- For one cup of bulgur which serves 2 persons, use one cup of water in a sauce pan. Add few table spoon of oil and add seasoning such as salt, pepper and paprika powder. Let it come to a boil on high heat and then put on a lid and reduce the heat to low and let it simmer for 20-30 minutes or until tender and fluffy.

4- Serve the chicken with the vegetables and bulgur and if you like some tablespoons of Greek yogurt. 

This will taste grilled/barbecued and the sauce gives it a lovely sweet BBQ flavor which is not to overpowering. The chicken was tender inside but had a crusty outer layer which made it juicy and flavorful. The Greek yogurt is a great condiment that adds a round, creamy flavor and removes any over powering taste. The vegetables are caramelized to perfection with this sauce. The great thing with this sauce is you don't need any other seasoning, not even salt. I would definitely use this jerk/bbq sauce for other grilling/BBQ meals. I have heard people saying this sauce is spicy, but I think it is not spicy at all, it just gives it a very pleasant heat but nothing spicy that children would not be able to handle. I recommend this sauce for other meats as well.


Enjoy!

Wednesday 7 August 2013

Seared Salmon with Mashed Potato and Vegetables - Recipe

Whenever I cook my seared salmon with mashed potato and vegetables, I think of the lunch meals we were given at school in Sweden. This meal used be one of the many tasty ones served at my school. I was fortunate to go to a grade/high school that made lovely food at school which was healthy and delicious. I remember when I finished 9th grade and was going to high school, one thing that worried me was the food. So I shared my thought with the food lady in the school canteen and she started to laugh. She told me that they actually cook food for that high school as well. I was so happy that the next three years' school meals would be equally good. I often find me thinking of the various meals given during that period and try to cook it. Whatever recipe I use, It always turns out as good as it used to be several years ago.

Ingredients:
2 big salmon fillet
3-5 potatoes
1 cup frozen peas and sweet corn
1-2 tbsp butter
3 tbsp corn oil
1 tbsp olive oil
salt and pepper
sesame seed
paprika powder
ca 1 cup milk


Method:
1- Start by seasoning the salmon fillet with salt, pepper, paprika powder and sesame seeds. Heat a non-stick pan on high heat with the corn oil or any other oil of your choice. Place the salmon fillet with the skin side down  and allow to cook for 5-10 minutes or until browned and cooked half way through. At this point, reduce the stove to medium heat. Don't be tempted to move it to much. Then turn the fillet and cook for another couple of minutes until cooked through.

2- Boil the potatoes according to your own special way, until tender. Then add milk, and butter and season with salt, pepper and some paprika powder. Mash it up and put aside.

3- Last step is to fry the frozen vegetables in 1 tbsp of olive oil. Serve them together with the mashed potato and seared salmon and sprinkle a few extra sesame seeds over the vegetables.


Enjoy!

Saturday 3 August 2013

Vegetable and Chickpea Tagine - Feel Good Food Challenge (recipe)


I have finally taken the time to participate in a food challenge. I usually love to read blogs that organize various recipe challenges with different baking and cooking themes, but have not had time to participate in any specific myself. This month, I decided that I will. The blog with the funky name A Kick At The Pantry Door hosts a challenge every month called Feel Good Food. Every month there is a set theme with a key ingredient that is nutritious and healthy to use in your baking and cooking. The challenge for August month is to use GINGER

I love ginger and use mostly ground ginger in most of my stews and soups. I think besides all the healthy reasons to use it, it gives a bit of heat to the meal and a lovely exotic taste. 

For August's Feel Good Challenge  I am submitting my Vegetable and Chickpea Tagine.

Serves: 2-3

Ingredients:
1 can of chickpeas
1/2 courgette
1/2 aubergine
1/2 yellow paprika
3-4 potatoes
1/2 leek
1 inch fresh ginger
1/2 parsnip
3 tbsp olive oil
couscous (cooked according to the package)
few coups of water

Spices: 1 tsp of ground ginger, parsley, ras el hanout, ground garlic, pepper, ground cumin, ground coriander, 1//4 tsp ground cinnamon, 2-3 sliced of preserved lemon, salt to taste.

Method:
1- Slice all the vegetables and rinse the canned chickpeas. Heat the oil in a cooking pot on high heat and add all the vegetables together. Saute the vegetables for 3-5 minutes until they develop a golden color. Add the chickpeas in the pot and the spices as well and stir for few seconds until everything has an even coat of the spices. The heat should let the the spices develop a lovely aroma and release their oils.


2- Cover the chickpeas and vegetables with 2-3 cups of water depending on how thick or watery you like it and the lemon slices and bring it to a boil. Cover the pot with a lid once the water is boiling and reduce the heat and let it simmer for 25-35 minutes, or until the vegetables are cooked to desired tenderness.

3- When the tagine has been cooking for about 15 minutes, start to make the couscous according to the the instructions of the package. I usually take the amount of couscous I need and put it in a bowl and instead of covering it with water, I use ca 400 ml of stock from the tagine, to make the couscous tasty and spicy. That is the reason I use a few cups of water extra in the tagine. Place a plate on top of  the bowl and allow it to swell for about 5-10 minutes. 


4- Once the couscous s done, I usually sprinkle over 1/2 tsp of ras el hanout spice mix and extra salt, before fluffing it up with a fork.


5- Serve it by putting a few spoons of couscous in a Moroccan plate and pour the tagine over the couscous. 


Enjoy!

Thursday 1 August 2013

Swedish Salmon, Broccoli and Potato Gratin Dauphinois (laxlåda) - Recipe

One of my favorite memories from my Uni time is the various dishes we used to have for lunch or dinner while studying til late when we were about to have exams. A dear friend and I used to have Laxlåda (Salmon Gratin Dauphinois) every Tuesday at the restaurant on the ground floor of the Science Park building. Their salmon gratin was so creamy and cooked to perfection, that I never grew tired of it. One thing that annoyed me though, was that I could never wait for it to cool down and would always burn my mouth with the first bites.  But I simply had to have it once every week. So this is my take on that luscious and creamy gratin.

Ingredients
2 big salmon fillets
3-4 potatoes, sliced
1 cup of broccoli
1/3 cup of leek sliced
grated cheese
1 cup of double cream
2 eggs
1/2 cup milk
Seasoning: dried dill, chives, parsley, lemon juice, salt, pepper, Dijon mustard

Method:
1- Preheat the oven to 225 degrees. Cut the salmon to bite size pieces and layer them in a deep baking dish. Add a layer of leeks, broccoli and some of the grated cheese on top of the salmon.


2- Layer the sliced potatoes and pour over the cream sauce. Make the cream sauce, by simply mixing the double cream, milk, eggs and the seasoning, to your taste, in a bowl and pour it over the ingredients in the baking dish. If there is any element of the seasoning you don't like, simply leave it out.


3- Finish it of with another layer of grated cheese. Bake it in the oven for 35-45 minutes or until everything is golden brown and cooked through.


Enjoy!

Marble Cake with Cream Filling and Chocolate Ganache - Recipe

The weather has been great here in UK the past few weeks and my family have had a few lovely picnics so far. On one of the occasions my mother in low brought with her a lovely cake that was so delicious and moist that i simply had to take the recipe and try it out myself. It was a simply but very elegant marble cake with a light cream filling and decadent chocolate ganache. It is a fairly simple recipe similar to any sponge cake really but taste like heaven.

Ingredients
4 eggs
225 g butter
225 g sugar
225 g self raising flour
2 tsp vanilla paste
1 tbsp milk
2 tbsp cocoa powder
2 tbsp vanilla paste

Filling:
2-3 dl double cream (heavy cream) whipped with 1 tsp vanilla sugar

Topping:Chocolate Ganache
100 g dark chocolate
1 cup double cream
1/2 tbsp butter

Method:
1- Preheat the oven to 180 degrees. Start by mixing the butter and sugar with a handmixer in a bowl for more than 5 minutes until it looks pale and very creamy. Add one egg at a time and mix each for about 10 seconds before adding the next egg. 

2- Add the milk and vanilla paste to the mixture and mix well. Then sift the flour and fold through until the mixture is smooth.

3- Put about half of mixture into another bowl and add the cocoa powder.

4- Then add both the white and chocolaty mixture to a cake tin (mine was round 28 cm), dollop by dollop of each. Use a knife to swirl around in the mixture to make marble patterns. Once done, tap the tin on your work surface to ensure there are no air bubbles and then bake in the oven for about 45-55 minutes or until you insert a sharp object, like a knife, in the cake and it comes out clean. Leave it to cool.

5- While the cake is baking in the oven, you can do the filling and topping. The cream filling is quite straightforward. Just mix the double cream together with the vanilla sugar, but don't over do it, so you can easily spread it on the cake.

6- The chocolate ganache is simply made by breaking the chocolate in to smaller pieces and put them in a microwave safe bowl together with the double cream. Heat it in the microwave until the the cream is pretty warm for few seconds on high heat and let it sit for ca 5 minutes without touching it. Then, slowly stir it until glossy and smooth. Add the butter now an let it cool.

7- Once the cake has cooled, cut it in the middle and spread a generous layer of the the cream filling. Put on the second layer of the cake and pour over the chocolate ganache. Put it in the fridge to let the cream and topping set and firm up. Serve it with a lovely cup of tea.


Enjoy!