Monday, 29 April 2013

Smoked Turkey and Vegetables Baguette - Recipe

At university, our lunches use to be a simple baguette with our favorite filling: creamy curried chicken, kycklingröra baguette. I loved it and could have one almost every day. The chicken curry was so perfectly creamy and filling, for the affordable price of 35 SEK. I have tried myself many times to do this lovely baguette at home and in smaller quantities for parties, it has been always successful so soon there will be a post about that.
Macka - Kycklingröra
But today, I want to share my turkey and vegetable baguette with you. It is such a simple baguette and takes no time in doing it. Perfect for breakfast, lunch with a nice cold coke or afternoon snack and tea. It is full of nutritious vegetables and have a lovely smokey taste from the turkey which is perfectly completed with the creamy coleslaw and crispy onions.

Ingredients:

1 baguette
3 slices of smoked turkey
Crispy onions
2 tbsp coleslaw
2 tsp spreadable butter
5 slices of tomato
lettuce
6 slices of cucumber
crispy onion pieces (I used the top taste brand)


Method:

1- Slice your baguette half lengthwise in the middle and take out some of the soft white bread. Spread the butter first and the coleslaw. 


2- Sprinkle over the crispy onion pieces and place the turkey slices on top of it, slightly folded on one side.


3- Add the vegetables on top of the turkey slice, begin with lettuce and finish off with cucumber and tomatoes. U can also add cheese slices as well or any other nice ingredient you like with the turkey, but  I left it simple. 


Enjoy!


Freezing vegetables - Helpful Tips

In a family of three, I have weeks where we buy food and vegetables and we don't have time to eat everything. This will naturally lead to waste of food, due to it being rotten. But since I hate to throw away food I freeze what we cannot eat during its fresh phase. I have done this for some time now and it works perfectly every time. 

Being from Sweden, we are very good at recycling. The Swedish recycling program is in fact so successful that they need to import waste from other European countries for its energy conversion program, as burnt waste energy is being used for heating and electricity for Swedish households. We are taught from a very young age at schools the benefits of recycling and how the lack of it can be  harmful for the environment. 

So, when I moved to UK it was very natural for me to begin to recycle and have different bins for food waste, recyclable trash etc. At the same time I do my best to use up our food leftovers as much as possible to prevent it from going into the food waste bin. Having this in the back of my head every day when I cook, has helped me to come up with very good recipes for leftovers :)


Few weeks ago, I bought celery and broccoli for husband to make milkshakes but they ended up not being used. As I was going away for few days, I also cleared the fridge from most of the vegetables that I knew would not be used while I was away, such as zucchini, butternut squash carrots, few pieces of chopped up onions and garlic. So, I simply chopped up all the vegetables and put them in freezer bags and told family to take out only the amount they will use. This has been a very successful way to prevent me from having to much food waste and always have vegetables ready for a stew. 

Although, the best way of freezing vegetables should start with either of the two methods: blanching or  steaming, before putting them in the freezer. But I feel that it works well without these methods as well. It is really up to you how you prefer it, but please do freeze what ever you have for leftovers or before you vegetables go rotten, as almost everything can be reused. 

Wednesday, 10 April 2013

Bruschetta with Cherry Tomatoes and Mozzarella - Recipe

 For being somebody that love to cook, I can be really lazy sometimes and have zero inspiration. For those days, I still need to eat, and I prefer something easy, comforting and warm. For me, my Bruschetta with Cherry Tomatoes and Mozzarella are perfect for such days. 

My all time favorite inspirational YouTuber, Laura Vitale with her channel Laura in the Kitchen, is somebody I always go back to when I need easy and quick recipes. She makes the most delicious Italian food for all types of occasions. Her recipes are my first option I go to, when I need some great  and traditional meal ideas for those days I invite my Italian in-laws. She has at least 10 different ideas when it comes to do bruschettas. There are indeed endless variations and just use your imagination and you can create whatever topping you want for them. They are perfect to have as a snack, starter or side dish.

Ingredients:
13 cherry tomatoes, halved
1 mozzarella ball, shredded
few fresh basil leaves, chopped
1 French baguette, sliced diagonally
2 tbsp butter 
3 tsp of mixed dried herbs and garlic powder
1 pinch of salt and pepper and dried parsley 

Method:

1-Preheat the oven to 190C degrees. Wash and half the cherry tomatoes, shred mozzarella ball and chop the basil leaves. Mix it in a bowl and sprinkle over salt, pepper, and dried parsley to taste.


2- Slice the garlic baguette diagonally to get more surface, each slice should be ca 1/2 inch or 2 cm thick. Mix the butter with the dried herbs and garlic powder. Butter each slice of the baguette and add   an even amount of the tomato mix on each of them. In two of the slices I deliberately removed tomatoes as few family members don't like them.


3- Put the bruschetta slices on a baking tray and bake in the oven for 20 minutes or until golden brown and the mozzarella has melted.


The two following youtube clips by Laura Vitale are my inspiration for this recipe:


Enjoy!

Pan-fried Salmon with Couscous - Recipe


One of my favorite healthy meals are pan-fried salmon with couscous and fried vegetables. Why? Because it is so quick to do it. You might think that frying the salmon and vegetables are not particularly healthy, but it depends on what oil and what frying pan you use. I had some couscous left over from a previous dinner and decided to make a fish meal. Since salmon is one of my favorite fish it had to be my couscous and salmon dish. By adding vegetables, fried or boiled, it fills you up without adding too many calories.

Here, I used olive oil and a good non stick frying pan, for the salmon as well as the vegetables. A true 15 minute meal. Beat that Jamie Oliver :) 

Serves: 1

Ingredients:

1 salmon fillet, chopped into pieces
3 tbsp  chilli olive oil
1/2 cup frozen vegetables
1/3 cup instant couscous (leftover from a previous dinner)
2 tsp lemon juice

Spices: Pinch of salt and pepper, dried dill, lemon and garlic powder, fish spice mix
Spices for vegetables: Garlic and lemon powder, salt and pepper, smoked paprika, dried dill

Method:

1- I took out the left over couscous and heat it up in the microwave. Alternatively, make a cup of couscous according to the instruction on the package. Set aside.

2- Let the salmon fillet come to room temperature. Heat up a non stick frying pan over medium heat and add 1 tbsp olive oil. Mix all the spices and the lemon juice and pour it over the fillet and make sure it is coated on both sides. Fry the fillet skin side down for about 2-3 minutes. Then turn the fillet and fry the other side for another 2-3 minutes or until you see the fillet is cooked through. With a wooden spoon cut up the fillet into bite size pieces and give the salmon cubes another minute in the frying pan. Set aside.

3- Wash the frozen vegetable mix to remove any ice lumps. Then add the remaining 2 tbsp olive oil or less if needed in same frying pan. Sprinkle over the spices for the vegetables and fry them for few minutes until they are golden brown.

4- Serve the salmon together with the vegetables and couscous. Squeeze over some lemon juice for to keep it tasty and moist.

Enjoy!


Saturday, 6 April 2013

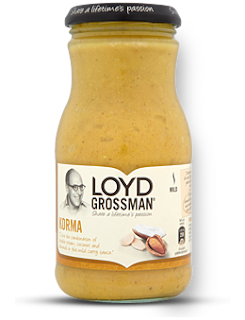
Loyd Grossman's Korma with Chicken - Recipe and Review

Loyd's Korma
Although cooking is a passion of mine, I do sometimes find it hard to find inspiration or rather time to find recipes and get new ideas for cooking during weekdays. Sometimes you want real comfort food that may take hours to cook a Wednesday evening when you come home from work, but just cant find the motivation or the energy to cook a meal from scratch. Therefore, it is clever to have few shortcuts that you can use in your cooking once in a while. 

My whole family love curries and we can eat it often, however, it does require some time and effort as well as motivation to go through the several steps to cook a really nice curry. Let's just face it, we don't have that in the middle of the week. That is when Loyd Grossman (LG) comes into the picture. Or at least, his curry sauces

LG is one of my favorite sauce brand which I often use in my daily cooking, when I need a good quality sauce. When I see them on sale, I definitely stack up a few jars of curries and pasta sauces. I have compared LG sauces with a few other brands, and I always like these best and prefer them over other brands. This korma sauce is very mild and has a sweet and velvety taste.

When you think of curries, you might think of hot and spicy as well as different spice flavors such as curry,  fiery chillies, pepper, garlic and ginger. This korma sauce is on the opposite side of the spectrum and is rather sweet and mild, which is sometimes exactly what you need. The mild, creamy coconut flavor is delicious and combined with few vegetables, it gives you a velvety and rich dinner when served with rise. To me, a ready made sauce needs to be rich in flavor, taste like it is home made and not have an artificial taste, and this LG korma sauce fulfills these requirements. Therefore I recommend this sauce, when you want quick and easy Indian korma sauce.

Serves 2-3

Ingredients:

1 jar Loyd Grossman Korma, 350 g

2 chicken breast, diced

2 tbsp vegetable oil.

1/2 cup of different vegetables such as: yellow paprika, peas, zucchini, carrots, spring onions (But you can use whatever you have on hand)

Roasted almond flakes

For a vegetarian dish, leave out the chicken.

Additional spices: 1/2 tsp of mild curry, salt, fenugreek, garlic and ground ginger


Method:

1- Wash and dice your chicken into bite size pieces. Wash and dice what ever vegetables you will use as well. I cut the paprika, zucchini, carrots and spring onion in 1 cm pieces.


2- In a deep frying pan, add the vegetable oil and let it heat up on high heat. Add the chicken and brown a little. Add the additional spices and mix well. I did this, so that the chicken pieces are not bland and has a nice coating of Indian spices. But can be completely skipped.


3- After the chicken pieced have become golden brown add the vegetables and salt it if needed. Mix well and let it cook for about 10-15 minutes. Add the Korma sauce and make sure to rinse the jar with 1/2 cup of water, shake well and pour it into the pan as well, to be sure that you use up every drop of the sauce in the jar.


4- Let the curry come to a firm boil and then bring down the heat to low to medium heat and let it simmer for about 15 minutes until the added water has reduced and you have a thick and creamy sauce.

5- Serve the Korma sauce together with Basmati rice. I usually use the Tilda rice brand.
Finish off by sprinkling some roasted almond flakes over. This is a substitute to cashew nuts, which is common in a Korma curry according to different recipes I found online.


Enjoy!

Friday, 5 April 2013

Roasted Chicken and Butternut Squash - Recipe

Roasted Butternut Squash
The butternut squash is a very versatile vegetable that can be used in numerous ways such as in a creamy soup or in a nice steamy Moroccan tagine or simply roasted in the oven and served as a side dish for the Sunday roast.

I was, however, a late starter with this vegetable and did not use it in my recipes until a few years ago. It was not a vegetable that my family used to use in our cooking and whenever I saw it in the supermarket, I would often wonder how the taste and texture would be, since I pictured it to be very similar to a pumpkin. Once I started to cook butternut squash and introduced it to my daily cooking I was pleasantly surprised how rich and tasty the warming flavors were, especially when roasted in the oven.

Therefore, I often use it as a complementary vegetable when roasting chicken cut into pieces.This dish is healthy and can be made without the chicken as a vegetarian meal and served with rise. It is as many other of my meals simple to make and does not require a lot of preparation  To vary this dish, I use whatever vegetables that are in for the season and different spices. The following recipe is very much inspired by Moroccan food and I have used their famous spice mix, Ras el Hanout as a change to the traditionally used thyme and rosemary when roasting chicken or vegetables. I love using those herbs but thought that I wanted to give the ras el hanout a try when roasting as opposed to using it only in stews and tagines. I loved the warm and spicy flavors which give a nice, fragrant aroma in the whole house, as if you were walking in the middle of a spice market..

Homemade olive oil with chillies
Serves: 3-4

Ingredients:
1 small chicken, cut into pieces
1/2 butternut squash
3 potatoes
2 carrots
2 onions
1 paprika
1 squash
chilli olive oil

Spices: salt and pepper, 1 tsp garlic powder, 2 tsp Ras el Hanout mix


Method:

1- Wash the chicken pieces and make sure they are coated with salt and pepper. Place them in a roasting tin.


2- Wash and peel all the vegetables and cute down to bite size. Salt and pepper the vegetables and place them on top of the chicken pieces in the roasting thin and spread them evenly.


3- Drizzle chilli olive oil over the chicken and vegetables and make sure they are well coated and finish off by sprinkling garlic powder and ras el hanout mix on top. Roast in the oven for about 50 minutes in the preheated oven, 200 C. If you like more broth add half a glass of water. Serve with Basmati Rise.


Enjoy!

Wednesday, 3 April 2013

Pizza with Homemade BBQ Sauce - Recipe


Whenever I ask family about dinner preferences, pizza frequently emerges as the easy favorite. The topping of choice is chicken, sweet corn, and BBQ sauce. Preferring not to purchase store-bought sauce due to its sometimes artificial taste, I enlisted my family's help to find an easy BBQ sauce recipe online. We experimented with various recipes and ultimately created our own unique blend. It was a hit with the family, and now it's our go-to sauce for pizzas.

Although I occasionally use pre-made pizza bases, I also enjoy making my own dough. My go-to recipe for quick pizza dough uses baking powder instead of yeast, eliminating the lengthy wait for the dough to rise.
Ingredients:

Pizza Dough:
6 dl of flour
2 tsp of baking powder
1.5 tsp of salt
100 g of butter
2 dl of milk

BBQ Sauce:
1 cup of ketchup
1 cup of water
3 tbsp of balsamic vinegar (or apple cider vinegar)
3 tbsp of brown sugar
1/2 tbsp of fresh ground black pepper
1/2 tbsp of onion powder
1 tsp of garlic powder
1 tsp of smoked paprika
1/2 tsp of ground cumin
1/2 tsp of ground coriander
1/2 tbsp of ground mustard
1 tbsp of lemon juice
1.5 tbsp of Worcestershire sauce
Salt and pepper to taste

Topping:
Grated cheese,
Diced grilled chicken breast,
Sweetcorn.

Method:

1- Preheat the oven to 210°C.

2- Begin by combining flour, salt, and baking powder in a large bowl. Incorporate the butter and milk, starting with a wooden spoon and eventually using your hands to mix it into a dough. Adjust with additional flour or milk if necessary. Then, transfer the dough onto a floured surface, knead for a few minutes, and shape it into a round ball.

3- Lightly flour the surface and roll the dough into your desired shape. I typically shape it into a square for easy cutting of uniform pieces.

Although the photo below shows a pre-made base, I normally use this recipe for pizza dough.


Place the pizza base in a greased oven tray and spread your BBQ sauce on top. Add the toppings, then bake in the oven for 20-30 minutes, or until it appears fully baked. Serve with a fresh and tangy pizza salad and dressing.


Enjoy!

Couscous Salad with Grilled Tomatoes - Recipe

Ottolenghi meets Morocco
To continue with my Moroccan theme, I have a delicious couscous salad to share.

Few months ago, the channel More4 showed Ottolenhi's Mediterranean Feast. I loved this program, as Chef Yotam Ottolenghi travels in Morocco, Tunisia, Turkey and Israel and discovers some of their lesser-known cuisines. My favorite episode is when he travels to Morocco and gives his personal touch to the traditional dishes of the region. 

The one recipe that I always go back to is his Couscous with grilled cherry tomatoes and fresh herbs. It is an easy and versatile salad that goes well with a piece of grilled lamb, skewer kebab or just on its own with some nice fresh yoghurt dip.

Serves: 8

Ingredients:
6 tbsp olive oil
2 large onions, sliced
1 tsp honey      (I skipped this)
1/2 tsp Ras el Hanout spice mix
60 g sultanas or raisins
600 g cherry tomatoes
500 g couscous
25 g unsalted butter
1 tsp cumin seeds, toasted and lightly crushed      ( I used ground cumin)
1 garlic clove, crushes       (I skipped, and used ground garlic powder)
80 g toasted almonds, roughly chopped
25 g rocket, roughly chopped     (I skipped)
20 g coriander, roughly chopped     (I skipped)
20 g parsley, roughly chopped
20 g mint, roughly torn
2 tbsp lemon juice
salt and pepper
2 tbsp argan oil


Method:

1- Preheat the oven to 150C.

2- Start by caramelizing the onions. In a saute pan on medium heat, add 2 tbsp olive oil, the onions, honey, ras el hanout, salt and pepper. Cook for 15-30 minutes, until onions are soft, dark and sweet. Remove from the heat, stir in the raisins and set aside.

3- Place a ridged griddle pan on high heat. Mix the tomatoes with 2 tbsp oil and cook in the hot pan for 4 minutes, until the skin is slightly charred. Set aside.

4- Line the base and sides of a roasting tin with baking paper, put in the couscous with 1/2 tsp salt. Pour over 800 ml of boiling water and 2 tbsp oil. Stir and leave to soak for 10 minutes, covered. Dot the soaked couscous with the butter and cover with foil and bake in the oven for 15 minutes. Once done, fluff the couscous with a fork.

I skipped this step as I used instant couscous. To 2 cups of couscous I added 2 + 1/4 boiling water in large bowl. Before covering it, I added the ras el hanout and 1/2 tsp ground cumin as well as 1 tbsp butter. Covered it with foil and let it soak up the liquid. Fluffed it with a fork in the end.


5- Once the couscous has cooled slightly, transfer to a large bowl. Add the onions mix and stir. Add the cumin seeds, garlic, almonds, rocket and most of the herbs.

In the program he chops some of the herbs in a bowl and mix it with the almonds and lemon juice as well as some olive oil. I followed that step and the mixed in the herbs with the couscous.


6- Finally add the lemon juice and salt & pepper and mix gently. Scatter the tomatoes over the couscous and finish with additional herbs and drizzle of argan oil. 


Enjoy!