Showing posts with label Cakes. Show all posts

Thursday, 1 August 2013

Marble Cake with Cream Filling and Chocolate Ganache - Recipe

The weather has been great here in UK the past few weeks and my family have had a few lovely picnics so far. On one of the occasions my mother in low brought with her a lovely cake that was so delicious and moist that i simply had to take the recipe and try it out myself. It was a simply but very elegant marble cake with a light cream filling and decadent chocolate ganache. It is a fairly simple recipe similar to any sponge cake really but taste like heaven.

Ingredients
4 eggs
225 g butter
225 g sugar
225 g self raising flour
2 tsp vanilla paste
1 tbsp milk
2 tbsp cocoa powder
2 tbsp vanilla paste

Filling:
2-3 dl double cream (heavy cream) whipped with 1 tsp vanilla sugar

Topping:Chocolate Ganache
100 g dark chocolate
1 cup double cream
1/2 tbsp butter

Method:
1- Preheat the oven to 180 degrees. Start by mixing the butter and sugar with a handmixer in a bowl for more than 5 minutes until it looks pale and very creamy. Add one egg at a time and mix each for about 10 seconds before adding the next egg. 

2- Add the milk and vanilla paste to the mixture and mix well. Then sift the flour and fold through until the mixture is smooth.

3- Put about half of mixture into another bowl and add the cocoa powder.

4- Then add both the white and chocolaty mixture to a cake tin (mine was round 28 cm), dollop by dollop of each. Use a knife to swirl around in the mixture to make marble patterns. Once done, tap the tin on your work surface to ensure there are no air bubbles and then bake in the oven for about 45-55 minutes or until you insert a sharp object, like a knife, in the cake and it comes out clean. Leave it to cool.

5- While the cake is baking in the oven, you can do the filling and topping. The cream filling is quite straightforward. Just mix the double cream together with the vanilla sugar, but don't over do it, so you can easily spread it on the cake.

6- The chocolate ganache is simply made by breaking the chocolate in to smaller pieces and put them in a microwave safe bowl together with the double cream. Heat it in the microwave until the the cream is pretty warm for few seconds on high heat and let it sit for ca 5 minutes without touching it. Then, slowly stir it until glossy and smooth. Add the butter now an let it cool.

7- Once the cake has cooled, cut it in the middle and spread a generous layer of the the cream filling. Put on the second layer of the cake and pour over the chocolate ganache. Put it in the fridge to let the cream and topping set and firm up. Serve it with a lovely cup of tea.


Enjoy!

Thursday, 4 July 2013

Pimp up a bought cake

Few days ago I made a cake to give to my neighbors and got some vanilla and coconut cream left over. I did not want to throw it away so I saved it in the fridge, trying to think of a way to use it up. When husband came home yesterday, he had bought a vanilla and chocolate cake from our supermarket. Since it looked quite plane, I decided to use the vanilla and coconut cream to pimp it up.


 I cut the sponge cake diagonally to create two layers. I spread spread both the vanilla and coconut cream on the first layer and put on the top layer so that it looked like a Victoria sponge cake with a cream filling. The cake was really delicious and moist and the cream made it so much tastier. Although I usually make my own sponge cakes at home, I can now buy a good quality cake and just pimp it up by adding different layers and fruits.


Saturday, 29 June 2013

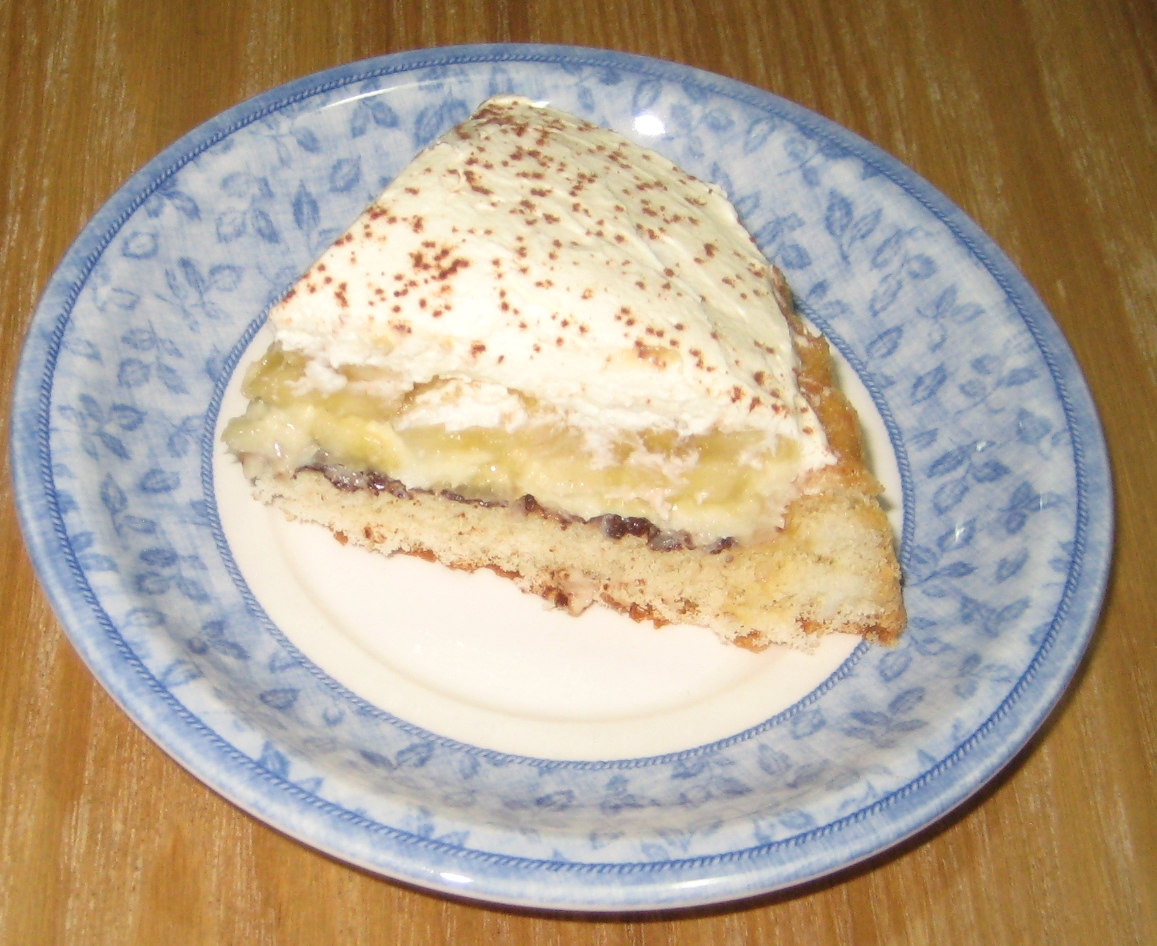
Coconut and Banana Cream Cake - Recipe

The past few days I have been very ill and got a terrible cold. So being in bed for most of the time, I had plenty of time to check video clips of my favorite youtube chefs. One of them is Stephanie Jaworski (Joyofbaking) who gives step by step instructions of how to bake various things. I checked several videos of different pies which she demonstrates. Her Banana Cream Pie looked very luscious and decadent, so I decided to give it a go myself, but as usual put my own little twist on it. 


I love the combination of coconut and banana, and therefore use both of these flavors, as well as chocolate and vanilla cream. Usually a pie is based with a shortbread crust, but I skipped this part completely and used a medium flan case, which tastes just like a layer of sponge cake. You can usually find them in the baking section in most supermarkets. This particular one comes from Sainsbury's. I wanted my cake to have a nice and fluffy base and not a hard shortbread crust as I am not a big fan of them. If you can not find one of these flan cases, you can always make a sponge cake and cut it in 2 layers and use one of them. Then, I did a vanilla cream by using the Marsian cream which is instant vanilla cream from Sweden. But you can make any vanilla cream you like and use it. I also made a very light coconut caramel sauce for this cake. A few easy steps, but what a lovely and decadent cake!!

Serves: 4

Ingredients:

1 flan case (or a pie crust)
1/4 cup desiccated coconut
2 tbsp golden syrup
2 tbsp brown sugar
3 tbsp doouble cream
2 tsp vanilla sugar
1/3 of dark chocolate bar
1 big banana, diced
1 cup vanilla cream
1 cup whipped cream
coco powder


Method:
1- Begin with making the light coconut caramel sauce. In a sauce pan, add all the ingredients for the sauce and mix well: coconut, double cream, golden syrup, brown sugar, vanilla sugar. Stir the mix on low heat until light brown and put a side.


2- Make your vanilla cream or pudding. If you cant do any of them you can even use a very good quality custard. If it is to runny, mix in few spoons of whipped cream to make it light and fluffy. 


3- Dice the banana in thin slices. Warm the chocolate in the microwave for 20 seconds until you can stir it into a smooth and spreadable consistency. Start the first layer of the cake case by spreading the melted chocolate on.


4. Let the chocolate set a little and then spread the coconut and caramel sauce on top of the chocolate layer.


5. After the first 2 layers, spread an even layer of the vanilla cream. Add the diced banana on top of the vanilla cream and press a little so it sets properly in the cake case and has vanilla cream around the banana slices.


6. The last layer of the cake is the whipped cream. You can either spread it on like I have done or pipe it nicely. Sprinkle some cocoa powder in the end and put the cake in the fridge to chill so all layers sets. 


7. Serve the cake with a nice cup of tea or coffee.


My inspiration for this cake comes from Stephanie Jaworski's Banana Cream Pie. She is a great inspiration for me when it comes to baking and I have tried several of her recipes by following her great youtube channel Joyofbaking1. Helene gave me the tip to follow her videos when I was not so successful with my cupcakes in the beginning of my baking trials. From then on, I always check her videos first when I bake as she usually always have a demonstration of anything I would like to bake. 


Enjoy!
Thursday, 17 January 2013

Light Chocolate Cake with Coconut and Almond Glaze

Chocolate and coconut is a combination that can never go wrong and an all time favorite flavor combo of mine. Just think about the bounty chocolate bar. My next cake recipe is a light chocolate cake with a sweet and delightful coconut and almond glaze. It is quite an easy cake and doesn't take much time at all. I hope you give it a try.

Recipe:

Ingredients for the cake:
100 g caster sugar
100 g self-raising flour
2 eggs
100 g butter
2 table spoon coca powder
1 tsp vanilla sugar or vanilla paste

Ingredients for the glaze:
4 dl desiccated coconut
3 table spoon roasted almond flakes
1 dl golden syrup
1,5 dl sugar
2 dl double cream
50 g butter

1- Begin with whisk butter and sugar for the cake until creamy in the consistence, then add one egg at a time and whisk for 10 second each. Preheat the oven at 180 degrees.


2- Sift the flour, vanilla sugar and cocoa powder and fold it in the wet mix. Then put it in a cake tin (see above photo).


3- Bake the cake for about 15 minutes until done. Check with a knife if it is done or not. 

4- While the cake is baking in the oven you can make the glaze. Simply add all the ingredients in a sauce pan and on medium heat. Let it come to a boil and then turn down the heat and let it simmer for 5 minutes.


 5- Take out the cake when done and spread the coconut glaze over it and put it bake in the oven for another 12 minutes until golden brown.


                                                    I like to serve it with a glass of milk :)


Enjoy !

Tuesday, 11 December 2012

Light Coconut Cake - A family favorite

The other day, I was in the mood for something light and sweet. Naturally, I thought of my beloved sticky chocolate cake (kladdkaka), but it felt a bit too indulgent. I was craving coconut instead, so I decided to make a coconut cake—an easy, delicious option that always hits the spot.

Now, this cake can be made in  various ways, but the recipe I'm sharing has been a staple in my family for years. It’s our go-to for a quick and satisfying treat, perfect for any occasion. In fact, I whipped it up during a break while watching the heartwarming movie When Pigs Have Wings When Pigs have Wings.


Coconut Cake


Ingredients:
1,5 dl desiccated coconut
100 g butter
2 eggs
1 dl milk
3 dl self-raising flour
1 tsp vanilla sugar (or use 1 tps vanilla extract)
2 dl sugar
3/4 tsp baking powder
1/4 cup of toasted flaked almonds
(if using plain flower, add 1,5 tsp baking powder)

Process:
1. Preheat the oven to 170°C (340°F).
2. In a bowl, cream the butter and sugar until light and fluffy.
3. Add the eggs one at a time, mixing well after each addition. Then, fold in the vanilla sugar, almonds, and desiccated coconut.
4. Sift the flour and baking powder over the mixture, then gently fold it in. Be careful not to overmix.
5. Pour the batter into a greased cake tin and bake for 40 minutes, or until golden and a toothpick inserted comes out clean.

Serving Suggestions:

You can enjoy this coconut cake as it is, but for an extra touch, try a light topping. Here’s a simple, flavorful version I often use:

Light Coconut Topping:
50 g melted butter
2 tsp vanilla sugar
1 egg yolk
2 tbsp desiccated coconut
2 tbsp sugar

Mix all the ingredients together. Once the cake has cooled slightly, poke a few small holes in the top and drizzle the mixture over. Let it rest for a few minutes before serving to let the flavors soak in.

For an alternative, serve the cake plain with lightly whipped cream and some fresh berries like raspberries. It’s a fresh, elegant way to enjoy this classic treat!


Enjoy!

Tuesday, 2 October 2012

Strawberry Cake with Vanilla Cream

Source
My Strawberry Cake with vanilla cream is my all time favorite cake. I have never had a tastier cake than this. It is quite heavy and sweet, but the flavors are delicious and I never get tired of making and eating it. The way I make the strawberry cake is very similar to another very famous Swedish cake called the Princess cake (Princesstårta). It is a typical Swedish cake served with coffee for afternoon tea. The combination is so good and it really is a cake for royals, hence the name :)

The Swedish Princess cake is very similar to mine in the sense that it looks the same inside of it, with the vanilla cream and strawberry jam. The difference is that mine has whipped cream and fruit covering the whole cake, while a proper Princess Cake is covered with a tasty marzipan icing. 

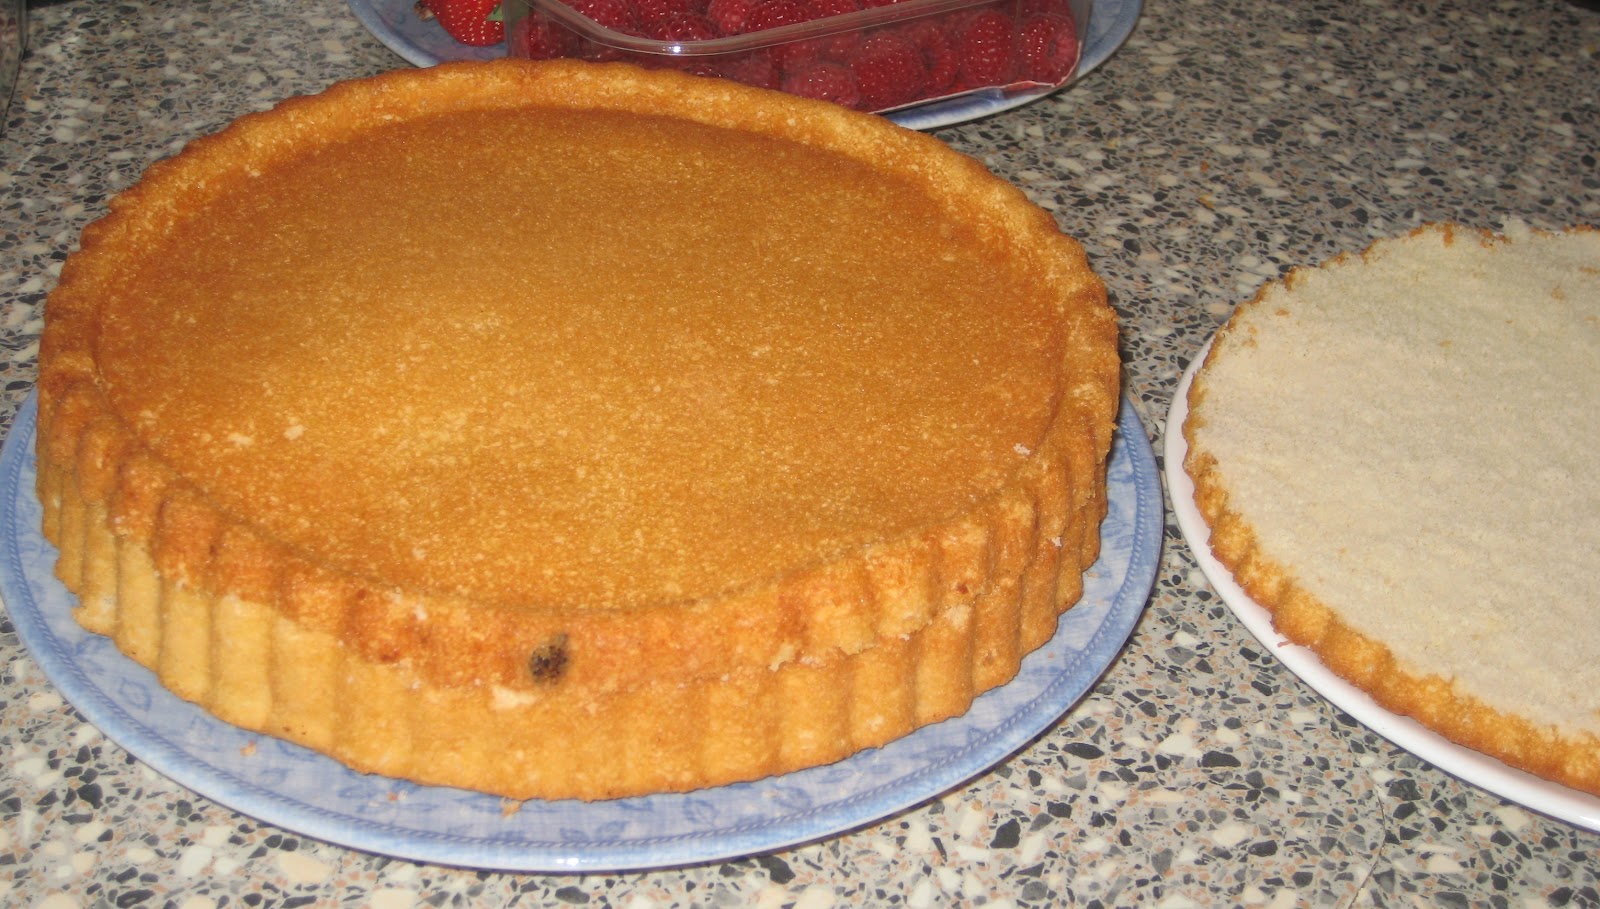
There are two different ways in doing my Strawberry Cake. Either you make the sponge cake base yourself or you buy ready made cake layers. In Sweden there are sponge cake bases already cut in 3 layers which I often used when I didn't have time to bake my own cake. Here in UK, I have been looking for something similar and these 2 cakes below are the closest I have come in finding already made cake bases. If you have better alternatives please share it with me. 

So I bought 2 of these cakes and one of them I simply cut in the middle to create 3 layers.


Although my cake is called the Strawberry cake, I actually use more fruits than just strawberries, such as banana, kiwi and raspberries or blueberries. I begin with a layer of vanilla cream (not custard). There are different recipes of vanilla cream you can find online. I usually use snabb-marsan from the brand Ekströms, which is a quick  mix of vanilla cream powder and milk, but I often use a little dubble cream to make it thick and smooth.


The first layer of the cake is prepared with the vanilla cream. The good thing with these cakes are that they have a depth in the middle with higher sides so that you can fill it with the vanilla cream without spilling over the sides. I usually add bananas to this layer.


The second layer was the top part cut from the second cake base. I used the top part so I could fill it with strawberry jam and fresh strawberries. That way it will not spill or run done on the sides.


The 3d layer is the actual bottom of the cake base that I cut into 2 pieces, which I put upside down as it is flat and smooth. It will therefore make it easier to spread the whipped cream. The corrugated pattern of the sides around the cake makes  it easier as well to apply the whipped cream all around it.


Lastly, I decorate the cake with the rest of the fruits. This cake is super easy to make and does not take to much time once you have a ready made cake base. Everyone who tasted it, said it was really delicious. I would definitely recommend you to give it a try :) and if so, please share your ideas and the result with me.