Thursday, 13 March 2025

Quick last-minute work salad


We’ve all been there—working late, feeling hungry, and realizing we haven’t eaten yet. That happened to me one evening at work, and I had no plan for dinner. But a quick peek into our shared office fridge saved me!

What did I find? A small cucumber, some tomatoes, one boiled egg, salad leaves, a bit of feta cheese, an apple, and a bottle of crème de balsamico. Not much, but enough to make something delicious. I simply chopped everything up, drizzled the balsamico on top, and voilà—a fresh, tangy, and slightly sweet salad was born.

That evening, I learned a simple but valuable lesson: always keep some salad spices or simple dressings at work. A little seasoning can transform even the most basic ingredients into something tasty. Now, I make sure to have a small stash of essentials like olive oil, balsamic glaze, or a spice mix in my drawer—just in case!

Make Your Own Office Salad

The beauty of this salad is that it’s easy to recreate with whatever you have on hand. Here’s a simple formula:
A base – Any leafy greens or chopped veggies
A protein – Boiled eggs, cheese, or even canned tuna
Something sweet & tangy – Apples, balsamic glaze, or a squeeze of lemon
A topping – Feta, nuts, or croutons for texture


 Enjoy!

The perfect late-night dip with crisps


Some evenings call for something easy and indulgent —a snack that feels special but takes almost no effort. That’s where this creamy, savory dip comes in. It’s a simple blend of light crème fraîche, fresh lemon juice, aromatic dill, and finely chopped red onion. The result? A luxuriously smooth and tangy dip with crisps and veggies. Lately, crudités have been widely discussed on a popular food and lifestyle program, but this is my personal version—a no-fuss, extra-creamy dip that’s perfect for casual snacking.

One evening, while scrolling through Instagram, I saw a similar dip that looked so fresh and delicious. I knew I had to try it—but with my own twist. I decided to add my favorite vegetables, making it heartier and even more satisfying. Since then, this dip has become my go-to meal when I’m too lazy to cook dinner. It’s my little indulgence during my alone-time slot, those rare quiet moments when the kids and my husband are out at activities.

Ingredients:
3-4 tbsp of light crème fraîche
fresh lemon juice from half a lemon 
2 tbsp fresh dill, finely chopped
2 tbsp red onion, finely chopped
Salt and black pepper, to taste

Optional for serving:
  • Salted crisps
  • Sweet paprika slices
  • Carrot sticks
  • Small gherkins
Method: 
  1. In a bowl, mix together the crème fraîche, lemon juice, dill. 
  2. Season with salt and black pepper to taste and sprinkle over the chopped red onion.
  3. Let the dip sit for 5–10 minutes to allow the flavors to meld.
  4. Serve with salted crisps and fresh vegetables for dipping.

One of the best things about this dip is how effortless it is to put together. Just stir the ingredients together, let the flavors meld for a few minutes, and you have the perfect snack for lazy evenings. 


Enjoy!
 

Friday, 7 March 2025

How to revive a few-days-old baguette: a quick trick


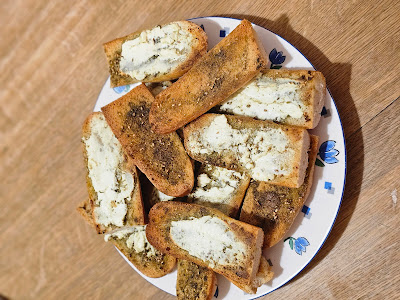
This is typical me—buying a fresh baguette, enjoying a few slices, and then forgetting about it for a couple of days. The result? A hard, stale baguette that doesn’t seem very appetizing. But I don’t toss it just yet! With a little creativity, it can turn it into something absolutely delicious.

One of my favorite ways to reuse an old baguette is to slice it up, drizzle it with olive oil, sprinkle on za’atar, and top it with crumbled feta cheese. Then, a quick toast in the oven, and voilà—you’ve got yourself a crispy, flavorful snack or side dish.

Ingredients:

  • Stale baguette, sliced
  • Olive oil
  • Za’atar
  • Feta cheese, crumbled

Method:

  1. Preheat your oven to 180°C (350°F).
  2. Slice the baguette into thin or thick pieces, depending on your preference.
  3. Drizzle each slice with olive oil, making sure they’re lightly coated.
  4. Sprinkle generously with za’atar. Crumble feta cheese over the top.
  5. Bake for 8–10 minutes, or until the bread is golden and crispy.
  6. Enjoy warm, either on its own or paired with a dip like hummus or labneh (yoghurt)


Enjoy! 

Sunday, 2 March 2025

Fresh & flavorful chicken couscous bowl

A meal that’s both light and satisfying is always a winner. I made this fresh and flavorful chicken couscous bowl last week, and it definitely hit the spot! It’s a perfect balance of textures and tastes, making it a great option for either lunch or dinner. 

I started by frying tender pieces of chicken until golden and juicy. Meanwhile, I prepared the couscous, making sure it was perfectly fluffy and infused with spices, such as a pinch of curry and cumin, to enhance its flavor. The dish wouldn’t be complete without a mix of fresh, chopped vegetables—crisp bell pepper, juicy tomatoes, lemon juice and parsley. 

Once everything was ready, I combined the couscous, chicken, and veggies, creating a deliciously wholesome mix. To finish, I drizzled balsamic cream on top, adding a touch of sweetness and depth to the flavors.


Enjoy!

Saturday, 1 March 2025

Mini thick pancake for the kids

Making pancakes for the kids is always a joy, because it is their favorite dish. I have also happily outsourced it to hubby. This time he made them smaller . He whipped up a batch of mini thick pancakes and served them with their absolute favorite toppings: creamy Nutella and a fresh mix of fruit.

The fruit selection included sweet pineapple, juicy strawberries, and kiwi, all chopped into bite-sized pieces for easy munching and dipping. 

To make the dish look even more delightful, I added a final touch—a light dusting of vanilla sugar powder. It not only made the pancakes look extra special but also added a hint of sweetness that tied everything together. 


Ingredients:

  • 1,5 cup flour

  • 0.5 cup sugar

  • 1 tsp baking powder

  • ¼ tsp salt

  • 2 egg

  • 1,5 cup milk

  • 2 tsp vanilla sugar 

  • 1 tbsp of melted butter

  • Butter or oil for frying

Method:

1. In a bowl, whisk together the flour, sugar, vanilla sugar, baking powder, and salt.

2. In a separate bowl, mix the milk, egg, and melted butter.

3. Pour the wet ingredients into the dry ingredients and gently mix until just combined. The batter should be thick. 

4. Heat a non-stick pan or griddle over medium heat and lightly grease it with butter or oil. Drop small spoonfuls of batter onto the pan to create mini pancakes. Cook for about 1-2 minutes until bubbles form on the surface, then flip and cook for another 1-2 minutes until golden brown. 

5. Serve warm with Nutella, chopped fruit, and a dusting of vanilla sugar powder.

The kids absolutely loved their mini pancake feast, and honestly, so did I! It’s such a simple yet delicious way to brighten up snack time.


 Enjoy!

Evening Sandwich Delight – A Cozy Treat Made by Hubby

Ending the day with a comforting meal is pure bliss, and for me, nothing beats the joy of my evening sandwiches – especially when they’re made by my husband. It’s become a little ritual that I absolutely adore. Last night, he outdid himself again, creating four different kinds of delicious open-faced sandwiches, each one packed with flavor and made with so much love. The base for all of them was frökusar, a wonderfully hearty and flavorful bread filled with seeds, adding the perfect texture and taste to every bite. Last night, he outdid himself again, creating four different kinds of delicious open-faced sandwiches, each one packed with flavor and made with love. Cheesy, right! but I wouldn't have it any other way. The base for all of them was frökusar, a wonderfully hearty and flavorful bread filled with seeds, adding the perfect texture and taste. We bought them, but I am sure there is a recipe for how to bake yourself. I need to check this. 

Here’s what was on the menu:

🥪 Skagenröra sandwich – A creamy and indulgent seafood delight.

🥪 Butter, cheese & fresh veggies – Smooth butter, topped with cheese, crisp lettuce, juicy tomato, and refreshing cucumber. A simple yet perfect combination.

🥪 Cheese, tomato, cucumber & olives – A mix of creamy cheese with tomato, cucumber, and olives. A Mediterranean touch!

🥪 Feta cheese, tomato, cucumber & olives – Another Mediterranean-inspired delight, this one with the bold, tangy flavor of feta cheese blending beautifully with the fresh veggies.

Each bite was a perfect balance of flavors, and of course, the best way to enjoy them was with a warm  cup of tea.

I love how food can bring warmth and love into everyday moments, and I’m so grateful for my husband’s thoughtful evening sandwiches. Simple, homemade meals truly are the best!


Enjoy!
 

Sunday, 16 February 2025

A Simple Snack - Greek Yogurt with Muesli, Banana, and Blueberries


Sometimes, I get hungry but don’t feel like preparing a full meal. I just want something simple, delicious, and satisfying. That’s when I turn to my go-to snack: Greek yogurt with muesli, banana, and blueberries. It’s effortless to make, and tastes absolutely heavenly!

Ingredients:

Greek yogurt (plain or lightly sweetened)

Your favorite muesli

A handful of fresh blueberries

One ripe banana, sliced

A sprinkle of cinnamon (the magic touch!)


How to Prepare:

Scoop a generous portion of Greek yogurt into a bowl. Add a handful of muesli for that perfect crunch.

Toss in fresh blueberries for a burst of sweetness and antioxidants. Slice a ripe banana and mix it in. 

Finish it off by sprinkling some cinnamon on top—this step is a game-changer!


Whenever I need a quick pick-me-up, this snack never fails me. I also have it as breakfast. It’s always a perfect choice. 


Enjoy!


Mexican Bowl – A Homemade Take on a Holy Greens Favorite


A few months ago, my niece introduced me to an incredible dish at Holy Greens – the Mexicali Bowl with plant-based ground beef. It was a perfect balance of freshness, spice, and texture, and I instantly fell in love with it. Ever since then, I’ve been wanting to recreate it at home with my own twist. After some experimenting, I’ve come up with a plant-based alternative. This dish is full of flavor and easy to make and so lively with the tortilla chips. 


Ingredients: 

300g  plant-based ground “beef” 

1 yellow onion, chopped

2 garlic cloves, minced

1 tsp cumin

1 tsp smoked paprika

1 tsp chili flakes

1 tbsp soy sauce

1 tbsp lime juice

Salt & pepper to taste


Chipotle crème:

1/2 cup crème fraîche (or plant-based alternative)

1 tbsp mayonnaise

1 tsp chipotle paste (or 1/2 tsp chipotle powder)

1/2 lime, juiced

Salt & pepper to taste

Bowl ingredients:

4 cups cooked black wild rice

1 bag mixed greens (e.g., romaine, spinach)

1 cup pickled red onion

1 cup diced mango

1 avocado, sliced

1/2 cup corn 

1 chilli, chopped

1 cup shredded carrot and red cabbage 

1 cup tortilla chips (for crunch)


Method:

1. Cook the Vegan “Beef” by heating oil in a pan and sauté onion and garlic. Add plant-based ground “beef” and spices, cooking for about 5-7 minutes. Stir in soy sauce and lime juice.

2. Make the Chipotle Crème by mixing all ingredients and adjust seasoning to taste.

3. Assemble the Bowl:
  • Place mixed greens at the bottom of the bowl.
  • Add black wild rice, slow-cooked vegan beef, pickled red onion, mango, avocado, and broccoli.
  • Drizzle with chipotle crème.
  • Sprinkle with tortilla chips for extra crunch.

Enjoy!

Wednesday, 18 December 2024

A Festive Workplace Feast


The holiday season is a magical time of year, and what better way to embrace it than gathering with colleagues for a festive Julbord? This year, our team decided to create a potluck-style Julbord at work, where everyone brought something special to share. The result? A table overflowing with delicious flavors and treats. 
A Julbord is a traditional Swedish Christmas feast, typically served buffet-style, featuring a variety of festive dishes.
 It includes classics like pickled herring, smoked salmon, meatballs, sausages, Janssons frestelse (a creamy potato and anchovy casserole), cheeses, vörtbröd (spiced rye bread), and sweet treats like gingerbread cookies. Julbord is a cherished part of Swedish holiday celebrations. 

A Brie-lliant Centerpiece
One standout was a creative brie cheese Christmas tree appetizer. Arranged with precision and care, this dish looked as festive as it was tasty. With layers of creamy brie, bright lingonberries, toasted almonds and sunflower seed in salt and chilli, and a drizzle of honey, it was almost too beautiful to eat—but we didn’t let that stop us!

Flatbread Rolls
Another hit was the flatbread rolls stuffed with smoked salmon and pepparrotssås (horseradish cream). These bite-sized delights were fresh, creamy, and had a hint of spice that paired perfectly with the delicate salmon.

Crustini Duos for Double the Fun
Crustini topped with a duo of toppings quickly became crowd favorites. Some were spread with cream cheese, dill, topped with silky slices of salmon, and garnished with briny capers. Others featured a savory feta cheese and slices of meat with drizzle of crema di balsamico, that complemented the crispy bread. Simple, yet absolutely satisfying.

Kladdkaka Muffins: Santa’s Sweet Hats
One of the most delightful contributions was from a colleague who brought kladdkaka muffins, Sweden's gooey chocolate cake in perfect single-serve portions. Each muffin was topped with a swirl of whipped cream and a fresh strawberry, cleverly designed to resemble Santa’s hat. They were as adorable as they were delicious.

For more sweet treats, we enjoyed an assortment of Christmas cookies. Gingerbread, shortbread...

Dill, Cheese, and Vörtbröd – A Taste of Tradition
Of course, no Swedish Julbord would be complete without traditional flavors. We enjoyed vörtbröd, a spiced rye bread, paired with cheeses and ham slices.
The best part of our Julbord wasn’t just the incredible food—it was the camaraderie. Sharing dishes we each prepared or selected with care made the event feel personal and meaningful. 

Our workplace Julbord was a wonderful and fun. Here's to more celebrations like this in the future—God Jul!


 Enjoy!

Wednesday, 2 October 2024

Taco Night with Friends: A Cozy Swedish Tradition

Last Friday, my daughter Losinda and I had the pleasure of being invited to a taco night at my friend’s house. We spent the evening together in the coziest way possible—enjoying tacos and watching Swedish Idol. It was the perfect way to wrap up the week, especially on a rainy Friday.

As we sat around the table, assembling our tacos with all the delicious fillings, it reminded me just how much of a tradition taco night has become in Sweden. For so many families, tacos are a must on Fridays, often referred to as “Fredagsmys” (Friday coziness). It’s a time to relax and kick off the weekend. 

History of Swedish Tacos:
Tacos weren’t always a part of the Swedish food scene, but they’ve steadily become a Friday-night staple since the late 1980s and 1990s. What started as a novelty imported from Tex-Mex cuisine quickly grew in popularity, thanks to its fun, customizable nature and the easy prep that makes it perfect for family gatherings.

However, Swedish tacos are a bit different from traditional Mexican or Tex-Mex versions. Instead of spicy salsas and slow-cooked meats, Swedish tacos typically include a variety of mild ingredients like ground beef, lettuce, cucumber, tomatoes, grated cheese, and a dollop of crème fraîche or taco sauce. The tortillas are often served alongside crispy taco shells, offering a mix of textures. The beauty of Swedish taco night lies in its simplicity and the way it brings people together. 

A Rainy Friday, Tacos, and Swedish Idol
On that rainy Friday, as we sat on the couch with our plates full of tacos, Swedish Idol playing on the TV in the background, it felt like the perfect mix of comfort and fun. We chatted, laughed, and cheered for our favorite contestants, all while sneaking bites of tacos.

For me, nights like this are the essence of what I love most—good food, great company, and the little traditions that make life feel warm and special. My daughter Losinda loved spending time with her friend, and it was heartwarming to see them giggling together while making their tacos just how they liked them. 


Ingredients:
500g ground beef (or vegetarian mince for a meat-free version)
1 packet taco seasoning (Swedish-style, mild and slightly sweet)
1/2 cup water
1 tablespoon vegetable oil (for frying)

8 hard taco shells
8 soft flour tortillas

Taco Toppings:
1 head of iceberg lettuce, shredded
2 tomatoes, diced
1 cucumber, diced
1 red bell pepper, diced
1 red onion, thinly sliced
1 cup grated cheese
1/2 cup sour cream
1/4 cup taco sauce (mild or medium, depending on your preference)
1 small jar of salsa (mild or medium)
1 avocado, sliced (optional)
Sweet corn
Pickled jalapeños (if you like a little kick)
Fresh cilantro (for a bit of freshness)
Lime wedges (for extra tang)

To do:
1. Heat a tablespoon of oil in a frying pan over medium heat. Add the ground beef (or vegetarian mince) and cook until browned, breaking it up into small pieces with a spatula. Once cooked through, add the taco seasoning and 1/2 cup of water. Stir well and let the mixture simmer for 5-10 minutes until the water has reduced and the beef is coated in the seasoning. Set aside.

2. Preheat the oven to 180°C. Place the hard taco shells on a baking sheet and warm them in the oven for 5 minutes until they’re crispy. For the tortillas, you can wrap them in foil and heat them in the oven for the same amount of time, or warm them one by one in a dry skillet over medium heat for 30 seconds on each side.

3. While the beef is cooking and the taco shells are warming, chop and prepare all your toppings: shred the lettuce, dice the tomatoes, cucumber, and bell pepper, slice the onion, and grate the cheese. Place all the toppings in individual bowls so that everyone can assemble their own tacos.

4. Lay out all the taco components—ground beef, shells, tortillas, and toppings—on the table. Let everyone grab a plate and start building their tacos however they like! Whether you prefer a crispy taco shell or a soft tortilla, the fun part is making it your own.


Swedish taco night is all about simplicity and fun. It’s a meal that encourages everyone to gather around the table, share stories from the week, and build their tacos just the way they like them. Plus, with all the colorful toppings and the mix of textures, it feels like a little fiesta every Friday evening. 

Monday, 30 September 2024

Leftover Magic: Bulgur Salad with Fried Halloumi


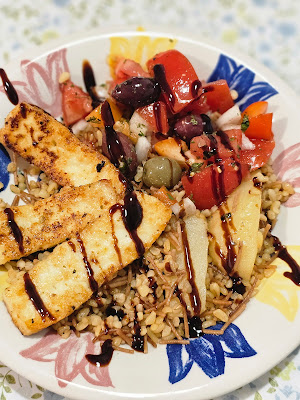
One day, I had some leftover bulgur from a meal earlier in the week. Rather than letting it go to waste, I decided to turn it into a fresh and flavorful side salad. Bulgur is such a versatile grain, and it pairs beautifully with Mediterranean flavors, so I raided my fridge for inspiration and ended up creating a dish that was both simple and satisfying.
I served the bulgur with chopped tomatoes, olives, red onion, and red bell pepper, then dressed it all in a splash of balsamic vinegar for a tangy kick. The combination of juicy tomatoes, the briny bite of olives, and the crunch of red onion made the salad light and refreshing. It was the perfect base for something a little heartier.

As I was prepping, I remembered I had a block of halloumi sitting in the fridge, waiting to be used. If you haven’t tried halloumi before, it’s a firm, salty cheese with a uniquely satisfying texture that holds up beautifully when fried. I sliced it up, tossed it into a hot pan with a little olive oil, and let it sizzle until golden and crispy on the outside. When I paired the crispy fried halloumi with the tangy, nutty bulgur salad, it was the perfect dinner—delicious, balanced, and completely vegetarian! 

This dinner came together in no time, thanks to the leftover bulgur and a few fridge staples. It’s a great reminder that you don’t need a complicated recipe to whip up something tasty. You can throw in whatever veggies you have on hand. Cucumber or spinach would work just as well. Plus, bulgur is packed with fiber, making it a healthy base for any salad. Fried halloumi is one of my favorite vegetarian proteins. Its crispy edges and chewy interior add such a satisfying bite to any dish, especially when paired with fresh ingredients like this.
 
Ingredients:
1 cup cooked bulgur (leftover or freshly made)
2 tomatoes, diced
1/2 cup black or green olives, halved
1/2 red onion, thinly sliced
1 red bell pepper, diced
2 tablespoons olive oil (for frying the halloumi)
3 tablespoon balsamic vinegar
Salt and pepper, to taste
Fresh herbs like parsley or mint (optional)
200g halloumi, sliced

Method:
In a large bowl, combine diced tomatoes, olives, red onion, and red bell pepper. Drizzle with balsamic vinegar and season with salt and pepper to taste. Toss well to combine.

Heat olive oil in a frying pan over medium heat. Add the halloumi slices and cook for 2-3 minutes on each side, until they are golden and crispy. Be careful not to crowd the pan, so the halloumi fries evenly.

Plate up the bulgur, the salad and top with the freshly fried halloumi. You can sprinkle some fresh herbs like parsley or mint on top for extra flavor if you like.

I simply love vegetarian dinners! They are often so fresh and full of vibrant flavors that I don’t even miss the meat. This meal is a great example of how leftovers and a little creativity can turn into something special.

Enjoy!
 

Sunday, 29 September 2024

Roasted Vegetable Tomato Soup: A Delicious Discovery

Lately, I’ve been seeing a lot of recipes involving roasted vegetables. The idea of roasting them to intensify their flavors, then blending them into a hearty soup, really caught my attention. I decided to give it a try, and the result was absolutely amazing! 

Not only was the soup delicious and wholesome, but it was also incredibly easy to make. The leftovers were perfect to store in a jar and take to work for lunch the next day, paired with a classic cheese sandwich. Talk about a satisfying meal! 

This roasted vegetable tomato soup is packed with flavor, and roasting the veggies brings out their natural sweetness, adding depth to the soup. Plus, it’s flexible—use whatever vegetables you have on hand! Here’s my take on the recipe, including a few tips to make it lunch-ready for your week ahead.


Ingredients:
5-6 ripe tomatoes, halved
2 red bell peppers, quartered and deseeded
1 large onion, peeled and cut into chunks
4 cloves of garlic, peeled
2 medium carrots, peeled and chopped
2 tablespoons olive oil
Salt and pepper, to taste
1 teaspoon dried thyme or oregano
1 teaspoon smoked paprika (optional, for a bit of depth)
3 cups vegetable broth
Fresh basil for garnish (optional)
Cream or yogurt (optional for serving)
sandwich on the side

To do:
1. Set your oven to 200°C. Arrange the halved tomatoes, bell peppers, onion chunks, garlic cloves, and carrots on a baking sheet. Drizzle with olive oil, and sprinkle with salt, pepper, thyme, and smoked paprika. Toss to ensure everything is evenly coated.

2. Place the baking sheet in the oven and roast for 25-30 minutes, or until the vegetables are soft and caramelized on the edges.

3. Once roasted, transfer the vegetables to a blender or food processor. Add 1 cup of vegetable broth and blend until smooth. Depending on the size of your blender, you may need to do this in batches.

4. Pour the blended vegetables into a large pot. Add the remaining vegetable broth and bring the soup to a gentle simmer. Let it cook for 10-15 minutes to allow the flavors to meld together. Taste the soup and adjust the salt, pepper, or spices as needed. If you prefer a creamier texture, you can stir in a splash of cream or a dollop of yogurt at this stage.

5. Serve the soup hot, garnished with fresh basil leaves or an extra drizzle of olive oil. Pair it with a crusty cheese sandwich for the perfect comfort meal!

Lunch Prep Tip:
This soup stores beautifully! Just pour the leftovers into a mason jar or any airtight container, and pop it in the fridge. In the morning, grab the jar and a cheese sandwich for a satisfying, homemade lunch at work. It heats up quickly in the microwave, and the roasted flavors get even better after sitting overnight.

Easy Cheese Sandwich Idea:
To keep things simple, I like to make a classic grilled cheese sandwich with sharp cheddar or gouda. You can toast it in a pan or oven for a crispy golden crust and a gooey center. The combination of warm, cheesy goodness and the rich, roasted soup is a match made in lunch heaven.

As for my lunch pairing, instead of the classic grilled cheese sandwich, I went with something that I always have on hand at work: knäckebröd with butter and cheese. If you’re not familiar with knäckebröd, it’s a type of Scandinavian crispbread—light, crunchy, and super versatile. It’s a pantry staple for me, perfect for quick lunches or snacks at the office. I usually top it with a smear of butter and a few slices of cheese (my go-to is gouda or sharp cheddar), which makes it a simple yet satisfying addition to my meal.

This combo with the roasted vegetable tomato soup was just right. The buttery crunch of the knäckebröd paired with the creamy, savory soup was a perfect lunch. Plus, it’s a lighter option than a traditional grilled cheese, but still packs a great contrast in textures and flavors.


 Enjoy!

Thursday, 26 September 2024

Chicken Curry Baguette: A Quick Favorite with a Swedish Twist

One of my all-time favorite quick meals, especially since my student days, is the deliciously creamy chicken curry spread in a fresh baguette. It’s a dish I’ve loved for years, not only because it’s easy to make (especially if you’ve got leftover chicken), but also because it’s so versatile. Whether you need a grab-and-go lunch or a cozy meal at home, this chicken curry mix hits the spot. And if you have the time to sit down and enjoy it properly, it's even better served as a dollop on a baked potato, with a crisp side salad to balance it all out. 
Simple, creamy, and surprisingly indulgent—a perfect way to brighten up a Thursday evening!

Ingredients:
2 cooked chicken breasts (leftovers work great)
1/2 cup mayonnaise
1/2 cup crème fraîche
1-2 tsp curry powder (adjust to taste)
1 tsp paprika
1 tbsp mango chutney (optional, for a bit of sweetness)
1 small apple, diced
1 paprika, diced
1/2 red onion, finely chopped
Salt and pepper to taste
Fresh baguette
Lettuce leaves (optional, for added crunch)

To do: 
1. Begin by shredding your cooked chicken breasts into small bite-sized pieces.

2. In a large bowl, combine the mayonnaise, crème fraîche, paprika powder and curry powder. Stir until smooth and creamy. If you like a bit of sweetness, add a tablespoon of mango chutney at this point.

3. Fold in the diced apple and finely chopped red onion and the paprika, giving the mixture a nice crunch and a hint of tartness. Season with salt and pepper to taste.

4. Slice the baguette in half lengthwise and spread the chicken curry mix generously onto the bottom half. Add a few lettuce leaves if you want some extra freshness, then top with the other half of the baguette.

Enjoy! This chicken curry baguette is perfect to take with you on the go, or, if you're staying home, serve it as a topping for a baked potato alongside a fresh side salad for a more relaxed meal.

A Short History of Chicken Curry in Sweden
Chicken curry spread (kycklingcurry-röra) has become a beloved dish in Sweden, especially in sandwich bars, delis, and student cafes. This dish made its way into Swedish kitchens during the 1970s and 80s, when more exotic flavors like curry became popular in Scandinavian cuisine. Influenced by the global spice trade and the increasing availability of international ingredients, curry powder found its place in everyday cooking, often paired with familiar ingredients like chicken and apple to suit the Swedish palate.

Chicken curry baguettes quickly became a popular “grab-and-go” meal in cafes, loved for their creamy texture, mild spice, and convenience. Today, this combination is a nostalgic favorite for many Swedes, offering a simple yet flavorful meal that’s perfect for busy days or casual dinners.

No matter how you serve it—whether in a baguette or on a baked potato—chicken curry spread has secured its place as a Swedish comfort food classic. 

And yes, what you see in the picture are bites my son took from the baguette—he just couldn't wait for me to take the photo!


Enjoy!


Game Night Snack: A Refreshing Dill and Seaweed Caviar Dip

With so much sports action happening on TV lately, it’s the perfect time to enjoy some delicious snacks while you cheer for your favorite team. One of my absolute favorites during these busy game nights is a simple yet flavorful dip that never disappoints. It’s quick to make, refreshing, and pairs perfectly with lightly salted crisps. Trust me, this is a winner whether you’re hosting a game night or just treating yourself!

Here’s what you’ll need:
  • Light crème fraîche
  • One lime
  • Fresh dill
  • Seaweed caviar (tångkaviar)
  • Chopped onions (preferably red for extra flavor)
To whip this up, start by spreading a generous layer of crème fraîche over half of a plate or shallow dish. Next, spoon on the seaweed caviar, scatter the chopped onions, and sprinkle a handful of fresh dill over the top. The final touch? Squeeze the juice from a fresh lime across the dip for that zesty kick. Serve it with lightly salted crisps, and you’re good to go!

The combination of the creamy crème fraîche, briny seaweed caviar, and the sharpness of the onion and lime creates a dip that’s fresh, tangy, and totally irresistible. The lightly salted crisps add the perfect crunch, making it a snack that’s ideal for game night, a quick bite between matches, or even as a starter before dinner.

It’s simple, it’s tasty, and best of all, it’s ready in minutes. 


Enjoy!


Wednesday, 25 September 2024

Air Fryer Burgers: A Quick, Crunchy Twist on a Family Favorite

On those hectic days when life feels like a race, sometimes you just need a meal that’s quick, easy, and guaranteed to please. In our household, one of the biggest lifesavers has to be ready-made fresh burger patties. They’re a breeze to whip up, especially when I let the air fryer do all the heavy lifting. But what really makes this meal a winner is the fun twist I’ve added: serving the burgers with salted crisps, and even sneaking a few inside for that perfect crunch! 
To do:
Here’s how it goes: I grab the fresh burger patties, toss them into the air fryer, and let them cook to juicy perfection in just a few minutes. No babysitting required. While they’re sizzling away, I get the buns ready, slice up some onions, prep the lettuce, and cut a few juicy tomatoes. A dollop of burger dressing (or whatever sauce you have on hand) goes on the buns with ketchup, and suddenly, you’ve got the makings of a classic burger.

Now here’s where the magic happens—crisps! Instead of serving fries or a side salad, I grab a bag of salted crisps. Not only do they add that salty, irresistible flavor to the meal, but here’s the kicker: I stuff a few right inside the burger. That extra crunch when you bite into it is a total game-changer. It takes the texture up a notch and adds a fun surprise, making the whole experience more exciting, especially for the kids. It's that simple twist that turns a regular burger into something extra special.
Of course, you can keep it classic and serve the crisps on the side too—because let’s be honest, a handful of salted crisps is never a bad idea. But adding them into the burger itself? That’s the next level. And the best part? The kids are all for it! It’s become a family-approved favorite, especially on those busy evenings when we need something fast and tasty that doesn’t require too much effort.


 Enjoy!

The Perfect Crispy Potato: A Simple Delight with a Flavorful Twist

There’s something magical about the humble potato. It’s versatile, comforting, and when you do it right, absolutely delicious. My current obsession? Crispy potatoes that are perfectly soft on the inside, golden and crunchy on the outside, and topped with cheesy, herby goodness. And the best part? It’s so easy, especially with the help of my trusty air fryer.

To do:
This dish starts with something simple—boiling the potatoes just until they’re tender. I like to use smaller potatoes for this recipe, but you can use whatever you have on hand. 
Once they’re boiled, here comes the fun part: tossing them into the air fryer. 
But not before sprinkling them generously with some shredded cheese, your favorite spices (paprika, garlic powder, and maybe a little rosemary), and a drizzle of olive oil.

The air fryer works its magic, transforming these already soft potatoes into crispy, golden perfection in just a few minutes. The cheese melts into a bubbly, savory crust, while the spices infuse every bite with flavor. The result? Potatoes that are crispy on the outside with a rich, cheesy coating, and soft, fluffy goodness inside. It's honestly the ultimate potato experience.

The dip:
But no crispy potato dish is complete without a dip, and this one is as easy as it is delicious. I mix Greek yogurt with crème fraîche, creating a creamy base that’s both tangy and rich. Then I add a simple garlic dip seasoning mix (the kind you can find at the store), which turns this combo into a heavenly dip that's both fresh and flavorful. The cool, creamy dip pairs beautifully with the warm, crispy potatoes, creating a perfect balance of textures and tastes.

Whether it’s a snack, a side dish, or even a meal on those nights when you just crave comfort food, these crispy potatoes have quickly become a favorite in my kitchen. The air fryer makes it effortless, and the addition of cheese, spices, and that creamy dip takes it to the next level.


 Enjoy!

Tuesday, 24 September 2024

Life in the Fast Lane: Macaroni with sausage

Life with three kids is like trying to balance on a tightrope while juggling flaming torches. It’s a whirlwind of school drop-offs, homework sessions, and endless football practices and matches. As a parent, you’re always on the move—packing bags, tying shoelaces, and ensuring no one forgets their water bottle. It’s a beautiful chaos, but when you're constantly bouncing between activities, the last thing you have time for is cooking an elaborate meal.

This is where the art of the super-fast meal comes in. There are days when I dream of having the time to prepare a slow-cooked meal, but more often than not, reality wins. Dinner needs to be on the table fast, and that’s okay! Sometimes, you just need to take the easy way out, and honestly? Some of the easiest meals are also the biggest crowd-pleasers in our house.

One of our go-to’s? Macaroni with sausage, ketchup, mustard, and a sprinkle of roasted onion. It’s not fancy, but it’s hearty and comforting, and—best of all—it’s a favorite with the kids. Plus, there’s something so nostalgic about it that it makes me feel like a kid again, too.

Another all-star on those crazy football nights is the simple but unbeatable korv med bröd—sausage in bread, with ketchup (and maybe mustard, if I’m feeling fancy). You can’t go wrong with it. It’s quick, portable, and ideal for those evenings when you’re racing from one place to another and need a meal the kids can eat in the car. No plates, no mess, just grab and go.

The best part? The kids love it! These meals aren’t just convenient for me—they're kid-approved, which makes dinner time less of a battle. On those hectic days when I’m tempted to feel guilty about not preparing something more “nutritious,” I remind myself that feeding happy, satisfied kids is what truly matters. And hey, sometimes you need the fast and easy option, especially when life moves at the speed of football drills.


Enjoy!
 

Wednesday, 18 September 2024

Decadent Chocolate Mousse with Crumbled Fudge Muffins

I was craving something chocolate and came up with this rich, indulgent dessert that’s also refreshingly balanced with fresh fruit.  this chocolate mousse paired with Swedish-inspired fudge chocolate muffins (known as kladdkakemuffins) is for you! I had some leftover muffins that my cousin made, and crumbling them on top of the mousse turned out to be pure magic. Add some grapes and pineapple for a tangy contrast, and you’ve got yourself a dessert bursting with flavor! This mousse is incredibly easy to make, and the combination of whipped cream and melted chocolate creates a silky, decadent texture without the need for eggs. It’s light, creamy, and pairs perfectly with the fudgy muffin crumbles and fruit!
Ingredients:
For the Chocolate Mousse:
1 ½ cups of heavy cream
1 cup of semi-sweet chocolate chips or chopped chocolate
2 tablespoons of sugar (optional)
1 teaspoon of vanilla extract
Chocolate shavings

For the Toppings:
1 or 2 fudge chocolate muffins (kladdkakemuffins, crumbled)
A handful of grapes (halved)
Fresh pineapple, cut into small chunks

Method:
1. Melt the chocolate in a small saucepan over low heat, stirring constantly to prevent burning. Let it cool for a few minutes.

2. In a separate bowl, whip the heavy cream with an electric mixer until soft peaks form.
Gently fold the cooled melted chocolate into the whipped cream, adding sugar, chocolate shavings and vanilla extract if desired. Mix until smooth.

3. Spoon the mousse into serving glasses and chill in the refrigerator for at least 2 hours.
4. Crumble the kladdkakemuffins on top of the chilled mousse. Add halved grapes and pineapple chunks on the side for a burst of tangy sweetness. Garnish with chocolate shavings.

Fudge Chocolate Muffins (Kladdkakemuffins):
Kladdkakemuffins are the Swedish equivalent of a rich, gooey chocolate cake in muffin form. They’re super fudgy, slightly crisp on the edges, and irresistibly soft in the middle—perfect for crumbling over mousse or enjoying on their own!

Ingredients:
1 stick (½ cup) of unsalted butter, melted
1 cup granulated sugar
2 large eggs
1 teaspoon vanilla extract
⅓ cup unsweetened cocoa powder
½ cup all-purpose flour
A pinch of salt
Optional: a dusting of powdered sugar for garnish

Method:
1. Preheat the oven to 175°C and line a muffin tin with paper liners.

2. In a bowl, whisk together the melted butter and sugar until smooth. Add the eggs one at a time, followed by the vanilla extract, and mix until well combined. Sift in the cocoa powder, flour, and salt. Stir until you get a thick, smooth batter.

3. Spoon the batter evenly into the muffin liners, filling each about halfway.
Bake for 10-12 minutes. The muffins should be set on the outside but still slightly gooey in the center. This gooeyness is the hallmark of kladdkakemuffins! Let the muffins cool for a few minutes before removing them from the tin.

4. You can dust them with powdered sugar or, as I did, crumble them on top of the mousse for a chocolate explosion!

5. Final Touch:
Once your mousse is chilled and your muffins are crumbled, it’s time to assemble! The rich mousse, fudgy kladdkakemuffins, and tangy fruit create a beautiful harmony of flavors. The sweetness of the chocolate, contrasted with the bright, juicy grapes and pineapple, is a sensory experience that’ll leave your taste buds singing.

This is a dessert that’s easy to make, fun to customize, and perfect for any chocolate lover. Whether you serve it as a fancy treat or simply want to elevate your dessert game, it’s bound to impress. Let me know how yours turns out! 😊

Enjoy your Swedish-inspired chocolate adventure! My kids loved it, especially with a glass of milk. 
🍫🍇🍍


 Enjoy!