Showing posts with label bread. Show all posts

Friday, 7 March 2025

How to revive a few-days-old baguette: a quick trick


This is typical me—buying a fresh baguette, enjoying a few slices, and then forgetting about it for a couple of days. The result? A hard, stale baguette that doesn’t seem very appetizing. But I don’t toss it just yet! With a little creativity, it can turn it into something absolutely delicious.

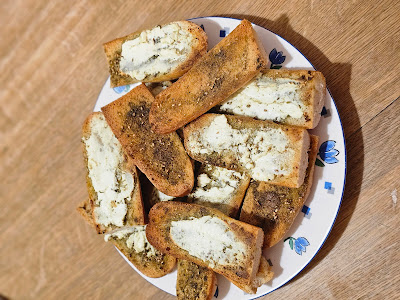
One of my favorite ways to reuse an old baguette is to slice it up, drizzle it with olive oil, sprinkle on za’atar, and top it with crumbled feta cheese. Then, a quick toast in the oven, and voilà—you’ve got yourself a crispy, flavorful snack or side dish.

Ingredients:

  • Stale baguette, sliced
  • Olive oil
  • Za’atar
  • Feta cheese, crumbled

Method:

  1. Preheat your oven to 180°C (350°F).
  2. Slice the baguette into thin or thick pieces, depending on your preference.
  3. Drizzle each slice with olive oil, making sure they’re lightly coated.
  4. Sprinkle generously with za’atar. Crumble feta cheese over the top.
  5. Bake for 8–10 minutes, or until the bread is golden and crispy.
  6. Enjoy warm, either on its own or paired with a dip like hummus or labneh (yoghurt)

Enjoy! 

Thursday, 12 September 2024

Diconstructed Brushetta no 2 - a plate of creamy buratta, herbs, tomatoes and garlic bread

The deconstructed bruschetta has become quite popular, so I chose to bring it along for a visit to a friend's, aiming for a convenient yet tasty lunch. Central to the dish were two exquisite pieces of burrata cheese, creamy and delicate, surrounded by roasted cherry tomatoes that burst with sweetness upon each bite. I generously drizzled the dish with pesto and crema di balsamico, adding a rich, tangy depth. A scattering of arugula added a crisp, peppery dimension to the creamy cheese. I also tossed in some yellow cherry tomatoes and fresh basil leaves, bringing a burst of freshness and vibrant color and flavor.

To complete the meal, I served it with toasted garlic bread, perfect for soaking up the wonderful array of flavors. My friend adored the simple yet delicious lunch, as we both enjoy vegetarian cuisine. She said she would definitely try making it herself. This dish is perfect as a side when hosting a BBQ.


Ingredients:
2 pieces of burrata cheese
250g cherry tomatoes
2 tablespoons olive oil
2 tablespoons pesto
3 tablespoon crema di balsamico (balsamic glaze)
A handful of fresh arugula
Salt and pepper to taste
4 slices of garlic bread
Dried parsley 
yellow cherry tomatoes
fresh basil leaves

Method: 
1. To roast cherry tomatoes, use either an oven or air fryer. For oven roasting, arrange the tomatoes on a baking tray, drizzle them with olive oil, and sprinkle with salt and pepper. Roast them for 15-20 minutes or until they are tender and have a slight caramelization. Once done, set them aside.

While the tomatoes roast, also toast the garlic bread in the oven until it becomes golden and crispy.

Place the burrata cheese at the center of a serving dish. Surround it with the roasted cherry tomatoes. Drizzle both the pesto and crema di balsamico over the cheese and tomatoes. Add fresh arugula over the top for a peppery touch, and finish with a liberal sprinkling of dried parsley.

Serve the dish with the toasted garlic bread, perfect for scooping up the creamy burrata and flavorful tomatoes. This fresh and vibrant dish is perfect for warm days when you want something simple yet full of flavor. 


 Enjoy!

Saturday, 7 September 2024

Bake Your Own Lingongrova Bread – Perfect for Snacks and School Lunchboxes

Lingongrova bread holds a special place in Swedish hearts, as well as for my kids. It's no wonder that it's a popular choice for both snacks and school break sandwiches. The sweet and tangy flavor of lingonberries combined with the rich and hearty character of whole-grain bread makes it a favorite for both kids and adults. I received a fantastic recipe from a colleague, and since my children love this bread (and we go through many loaves each week), I thought I’d share it with you. It’s simple to bake and perfect to freeze, so you always have fresh bread on hand.


Lingongrova is a classic dark bread rooted in the Swedish tradition of using whole grains and natural ingredients. Lingonberries, a common Nordic fruit, have long been a staple in Swedish cuisine because of their high nutritional value and long shelf life. The combination of fiber-rich whole-grain flours and the tangy sweetness of lingonberries makes lingongrova bread both healthy and delicious. This bread is not just tasty – it's also a way to pass on a piece of our Swedish culinary heritage to the next generation.

Ingredients:

 3 dl coarse rye flour

3 dl all-purpose flour

2 dl rolled oats

1 ½ tsp baking powder

1 ½ tsp baking soda

1 tsp salt

2 dl mix of seed: sunflower seeds, poppy seeds, flaxseeds, pumpkin seeds or any other seed of your choice 

3 ½ dl buttermilk or plain yogurt

2 eggs

1 dl lingonberry jam

1 dl light syrup

Additional liquid, such as milk, if needed

Method: 

1. In a medium bowl, mix together the dry ingredients: rye flour, all-purpose flour, oats, baking powder, baking soda, salt, and sunflower seeds.

2. In a large bowl, whisk together the wet ingredients: buttermilk (or yogurt), eggs, lingonberry jam, and light syrup.

3. Gradually stir the dry ingredients into the wet ingredients, mixing well. The batter should be sticky but not too wet. If it's too dry and resembles dough rather than batter, add a little more liquid, such as milk.

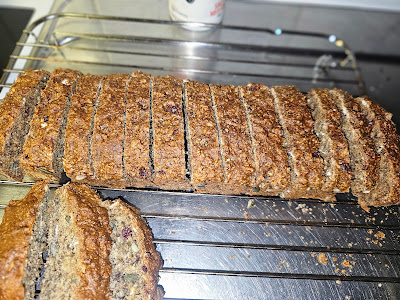
4. Pour the batter into a greased 2-liter bread tin. Bake in the lower part of the oven at 175°C for about 1 hour, or until the bread is dry in the middle. Use a thermometer to check that the internal temperature reaches 90°C (194°F).

5. Let the bread cool on a wire rack before slicing.

Enjoy your hearty, homemade rye and lingonberry bread—perfect for a wholesome snack, breakfast or packed into a school lunchbox! My favorite is to enjoy it with butter and cheese.


 Enjoy!

Monday, 25 June 2018

Butter and garlic baguette with tomato and mozzarella

When it comes to satisfying late-night cravings, few snacks rival the irresistible appeal of garlic bread loaded with juicy tomatoes, creamy mozzarella, and fragrant herbs. This simple yet indulgent treat is a favorite in my household, perfect for snacking solo or sharing with loved ones during cozy evenings. Made with love and a handful of fresh ingredients, this garlic bread is a staple in my recipe repertoire.

I purchase the garlic and butter baguette that already comes pre-sliced with incisions from the freezer section. It is perfect for stuffing with tomato and cheese. I enhance the flavour further by adding fresh basil and parsley from the herbs on my balcony. 

 After assembling the ingredients, I place the bread in the oven and grill it at 200 degrees Celsius for 20-30 minutes until it achieves a golden-brown hue. The result is a delectable treat with gooey melted cheese that tantalizes the taste buds.

This delightful creation frequently makes an appearance as a side dish during my gatherings with family and friends. Their enthusiastic response and delight upon seeing it served at the table never fail to bring me joy.

Ingredients:

1 loaf of pre-sliced butter and garlic baguette

Fresh tomatoes, thinly sliced

Fresh mozzarella cheese, sliced

Fresh basil and parsley leaves, for garnish

Method:

1. Preheat the oven to 200 degrees Celsius and line a baking sheet with parchment paper. Using a knife, gently pry open the cuts in the baguette, creating space to insert the toppings.

2. Fill each cut with alternating slices of tomato and mozzarella, ensuring an even distribution of ingredients throughout the baguette. Scatter fresh basil and parsley leaves over the of the bread, infusing it with vibrant flavor and color.

3. Bake the garlic bread for 20-30 minutes or until the cheese is melted and bubbly, and the baguette is golden brown and crisp around the edges. Once baked to perfection, remove the garlic baguette from the oven and allow it to cool slightly before serving.

Whether served as a standalone snack or alongside a hearty dinner spread, this garlic baguette is guaranteed to leave everyone craving more.


Enjoy!

Friday, 7 April 2017

Fried tortilla bread with chicken stuffing (quesadilla) - recipe

Taco and Mexican cuisine are a delight to savor, and I find them quite easy to make. However, we often end up with leftover tortilla bread that tends to go stale since we rarely use them again. Being committed to a no-waste policy, I always try to repurpose them into a new dish on another day. This time, I opted to transform them into crispy fried tortillas filled with flavourful chicken and potato stuffing. The result? A dish we enjoyed immensely, prompting me to plan on making them as tasty snacks for picnics once the weather warms up. 
Ingredients:
Several tortilla breads
2 chicken breasts, cut in bite-sized pieces
2 potatoes
1 onion
1 dl sweet corn
1 yellow bell pepper
1 tsp cumin
1 tsp smoked paprika powder
1/2 tsp coriander powder
1/2 tsp ginger powder
1 tsp garlic powder
1 tsp oregano
1 dl grated cheese
oil for frying

Method:
1. Begin by cutting the chicken breasts into bite-sized pieces. In a deep pan over high heat, fry the chicken pieces with a sprinkle of the spices. Add the sliced potatoes, diced onion, and bell pepper, along with the remaining spices. Stir in the sweet corn and mix everything well. Cover the pan with a lid and reduce the heat, allowing the stuffing to simmer until the potatoes are tender and the flavors meld together.

2. Once the stuffing is cooked through, place one tortilla bread in the pan and spoon half of the prepared stuffing onto one side of the bread. Fold the other half over the filling, creating a half-moon shape. Fry the filled tortilla until golden brown on one side, then flip and fry the other side until crispy and golden. Add a little more oil to the pan if needed.

Serve the fried tortilla bread with chicken stuffing hot, alongside a refreshing green salad for a lovely meal bursting with flavors.

Enjoy these crispy and flavorful quesadillas as a satisfying snack or meal, perfect for any occasion!


Enjoy!

Friday, 23 October 2015

Sandwich Ideas

Sandwiches is something I eat often and for every meal if I may choose. Bread is my biggest problem. I love it and I love it a lot. But I have come to the conclusion that it is OK as long as we eat them in moderation. For a girlfriend's birthday party I opted to do the sandwiches, as I have done so many different ones and with lots of variations in my life. No one protested :). I used white and brown  square bread as well as brown bread rolls. Tried to use different spreads and fillings, but ended up with classic fillings to make sure there were no surprises for picky eaters.


1. Smoked salmon and cucumber. For the first sandwich I used cream cheese as a spread and added smoked salmon and shavings of cucumber that was made by using the cheese slicer to get them evenly thick.


2. Turkey and vegetable sandwich. The second sandwich has a cream cheese spread, roasted onions, cheddar cheese, turkey slice, cherry tomatoes and lettuce.


3. These two sandwiches where cut in 4 squares and served with some crisps. I have never seen any where else where they add crisps in their sandwiches, but here they do. Have to say that the crunchy sandwiches are delicious.


 4. Egg and potato sandwiches. This filling was little more dense than the other two but they got a high mark too. Boiled eggs and boiled potatoes were mixed in a bowl. I added 2 tbsp of mayo, curry powder, paprika powder and water cress. Salt and pepper to taste and then cut in halves.


5. Scrambled egg sandwiches. The last filling was scrambled eggs on buttered toast with water cress. All sandwiches got thumbs up and the plates were soon empty to my happiness. 


Hope this post will give a few ideas of different sandwich fillings from the normal everyday sandwich.

Enjoy!

Tuesday, 16 July 2013

Fat Free Homemade Bread with Seeds in No Time - Recipe

One thing that I can not get enough of and that will always be a part of my diet, no matter how often I hear it is not healthy, is bread. It comes in different tastes, shapes and color. And I love them all, especially French baguette.

Here is a super easy recipe for bread rolls that you can make in no time, without waiting hours for it to rise. They are perfect for your long Sunday breakfast, to serve with soup or making sandwiches with it for picnics. This is how you can make these delicious bread rolls:

Makes: 8-10 rolls

Ingredients:
5 dl self raising flour
3/4 tsp baking soda
2 tbsp golden syrup
1,5 dl water
1 dl sour cream
seed of your choice (I used pumpkin,  and sunflower seeds)
sesame seeds

Method:
1- Add the flour,baking soda and a generous sprinkling of pumpkin and sunflower seeds in a bowl and mix.

2- In a separate bowl add syrup, water, sour cream and mix well. Pour the wet mixture in the same bowl as the flour and mix with a wooden spoon until a smooth dough is formed. Add a little more flour in case your dough is very wet. 

3- Form the bread into 8-10 rolls of bread and transfer them to a baking tray layered with grease proof paper.  Flatten each roll slightly with the palm of your hand in the middle as they will rise. Brush them with little water and sprinkle sesame seeds on top.

3- Preheat the oven to 200 c degrees and bake the bread rolls for about 12-15 minutes or until golden brown


Enjoy!